Welcome to Logos Red, I go bylogos and:
Want to start hacking cars but don’t have one to test on? You might be here because of my main tutorial, and you want to get familiar with CAN while waiting for your hardware to arrive.
Whatever the reason might be, this post will get you hacking your first virtual car. I want you to imagine the virtual car as a real car and for you to get just as excited.
Because this is what you’ll be doing in real life. This is your training for the real battle.
My Promise
This post will finally end your meaningless search for a valid answer, and you will leave with a virtual car hacking environment.
If there are still any questions left, let me know so I can add it to help the next person who will arrive here.
My Goal
To help you improve in less time than it took me and to make sure you leave with what I promised.
I want you to join our community and for this to be a place that you revisit often.
Requirements
- Linux-based machine: I recommend using a Kali Linux virtual machine.
- An understanding of the CAN bus: Here is my guide explaining it
What we’ll be covering
- Setting up a CAN network interface and using ICSim to simulate a simple CAN network.
- Sniffing CAN traffic with can-utils/Wireshark and sending your first command.
- Upgrading to SavvyCAN, which is what we’ll be using in real life.
Creating a virtual car hacking environment
We’ve seen in my CAN bus guide that everything up to the USB connected to your laptop is basically an ECU. Since we don’t have any hardware, we’ll be simulating that using software.
This is how we’ll do it:
Setting up a network interface
The Linux kernel includes built-in kernel modules that allow you to create your own CAN virtual interface.
You can type:
ip aAnd see your current network interfaces.
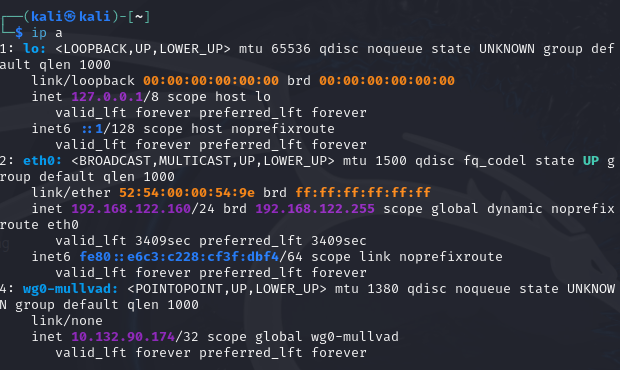
CAN stands for Controller Area NETWORK. So we can just as well add our own CAN network interface with the following commands:
  sudo modprobe can
  sudo modprobe vcan
  sudo ip link add dev vcan0 type vcan
  sudo ip link set up vcan0
If you know networking, you will realize that this is the same setup as any other type of network. Yes, we can use Wireshark.
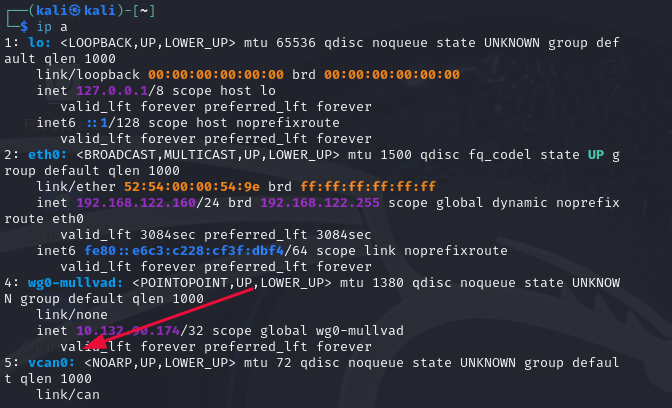
You can now see our new network interface, but it currently has no data as we are not simulating anything. Which is where ICSim comes in.
Simulating a CAN network with ICSim
What is ICSim?
ICSim stands for Instrument Cluster Simulator. It was created by ZombieCraig. It’s a program that will simulate a car with its own CAN network. We’ll be able to accelerate, use the turn signals, open and close doors to see the CAN messages.
Installing ICSim
This is the link to the GitHub and these are the commands to get you started:
We first need to install some dependencies and can-utils.
sudo apt install libsdl2-dev libsdl2-image-dev can-utils Now we need to clone the repository into a folder.
git clone https://github.com/zombieCraig/ICSim.gitChange directory inside of that cloned repository.
cd ICSimNow we need to build and compile the project with Meson.
sudo apt install meson
meson setup builddir && cd builddir
meson compile
And we are done, if you type “ls,” you will see two new programs: “icsim” and “controls.”

Remember, these are under ICSim/builddir, not the main ICSim
Starting up our virtual car
To do so run the following commands:
./icsim vcan0 &
./controls vcan0 &
You will get some messages in the terminal. But you can still type in your commands, since we’ve backgrounded the processes.
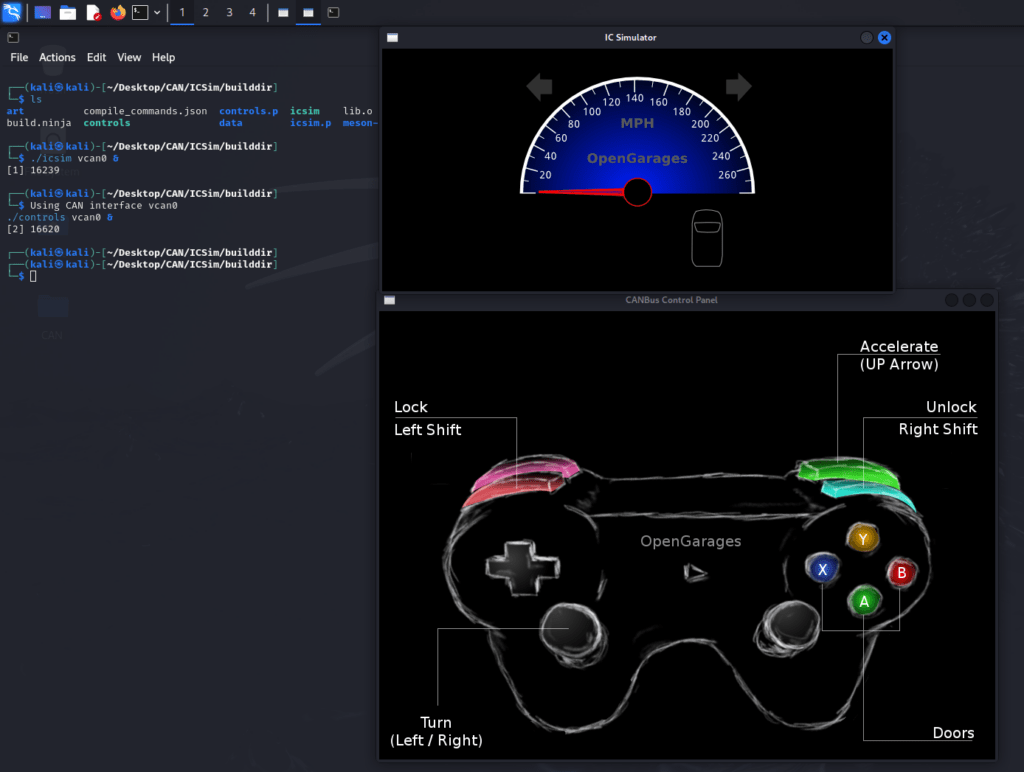
You are now the proud owner of your own virtual car. Do you want to take it for a spin?
Click on the control panel window and hit the up arrow, and you will see the car start to accelerate.
The Commands
Keyboard controls:
- Unlock: Hold Left Shift and press X,Y,B,A
- Lock: Hold Right Shift and press X,Y,B,A
- Accelerate: Up arrow
- Turn signals: Left and Right arrows
Gamepad controls:
- Unlock: Hold Left Shoulder button and press X,Y,B,A
- Lock: Hold Right Shoulder Button and press X,Y,B,A
- Accelerate: Right Trigger
- Turn signals: Left and Right on the joystick
Analyzing the data
Alright, alright, enough playing with the virtual car, let’s look at the data.
Go into your terminal and type the following command:
cansniffer -c vcan0You should now see a bunch of data flying, the red color represents data changing.
Looks complicated? It’s quite simple, you should be familiar with these fields from my CAN bus introduction and they’re simply put in a table.
- ID (Identifier): The ID in a CAN message is like a label that tells what the message is about, such as “engine speed” or “temperature.” The lower the ID, the more priority it has on the CAN bus.
- Data: This part contains the actual data being transmitted. This is where the information, such as the car RPM or speed, is held.
- Additional fields: The first field represents the timestamp, and the last field is an ASCII representation of the data.
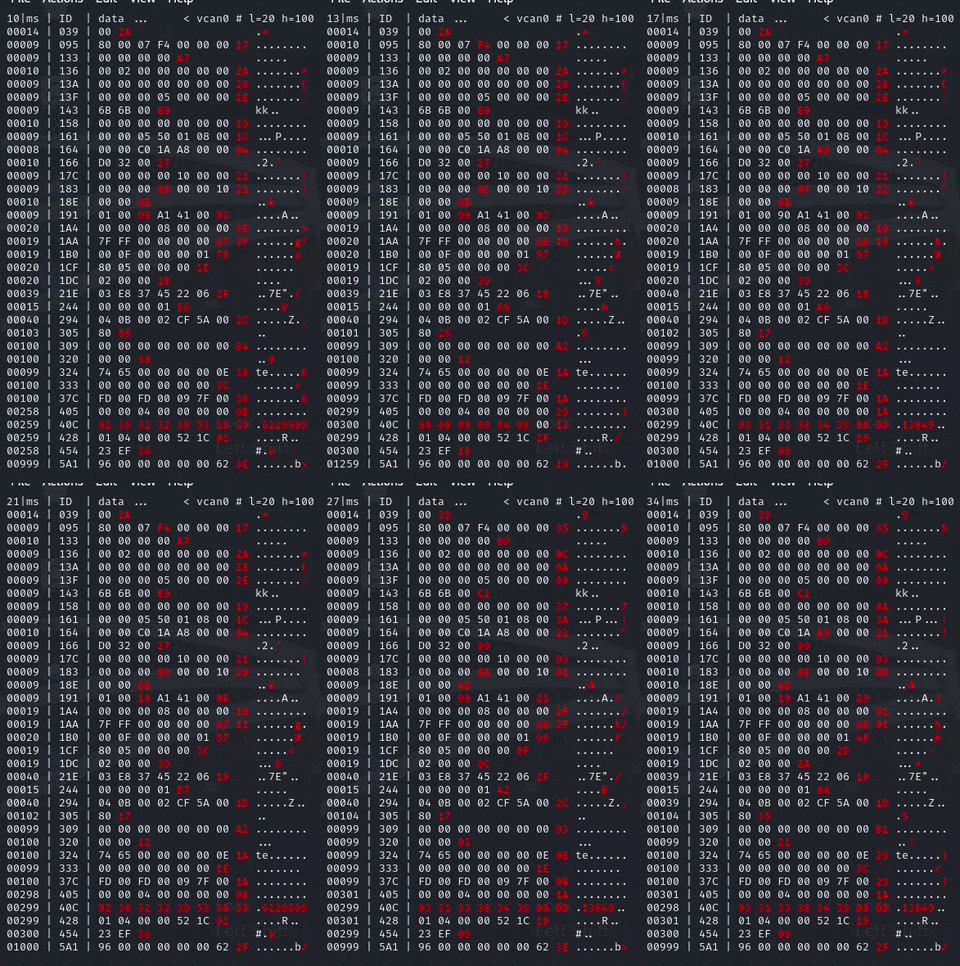
Why am I seeing so much data?
The CAN bus constantly sends out information (temp readings, airbag status, battery voltage, etc). So, you wouldn’t expect it to be stable. In a real car this would look even more hectic.
How can I see…less?
Since the data is repeating and we can see the changes, we can stop showing them. This process is called notching.
How to do so?
In the terminal send a pound (#) symbol by pressing: Shift + 3 and then Enter.
You won’t really be able to see the symbol but just keep sending multiple of them until your data looks stable
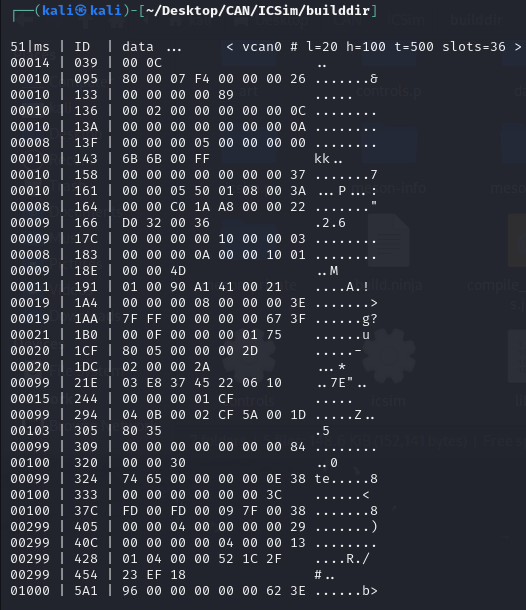
At this point you can see with certainty what bits do what. Try to accelerate the car now. You’ll see byte 3 (we’re counting from 0) ID 244 start to raise.
How do I know that it’s ID 244 for you?
The initial setup gives everybody the same seed (values used to create different environments) so we all have the same car.
If you want to play around with different cars here are the flags:
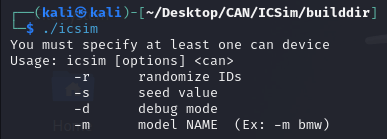
For example:
./icsim vcan0 -r -m bmw &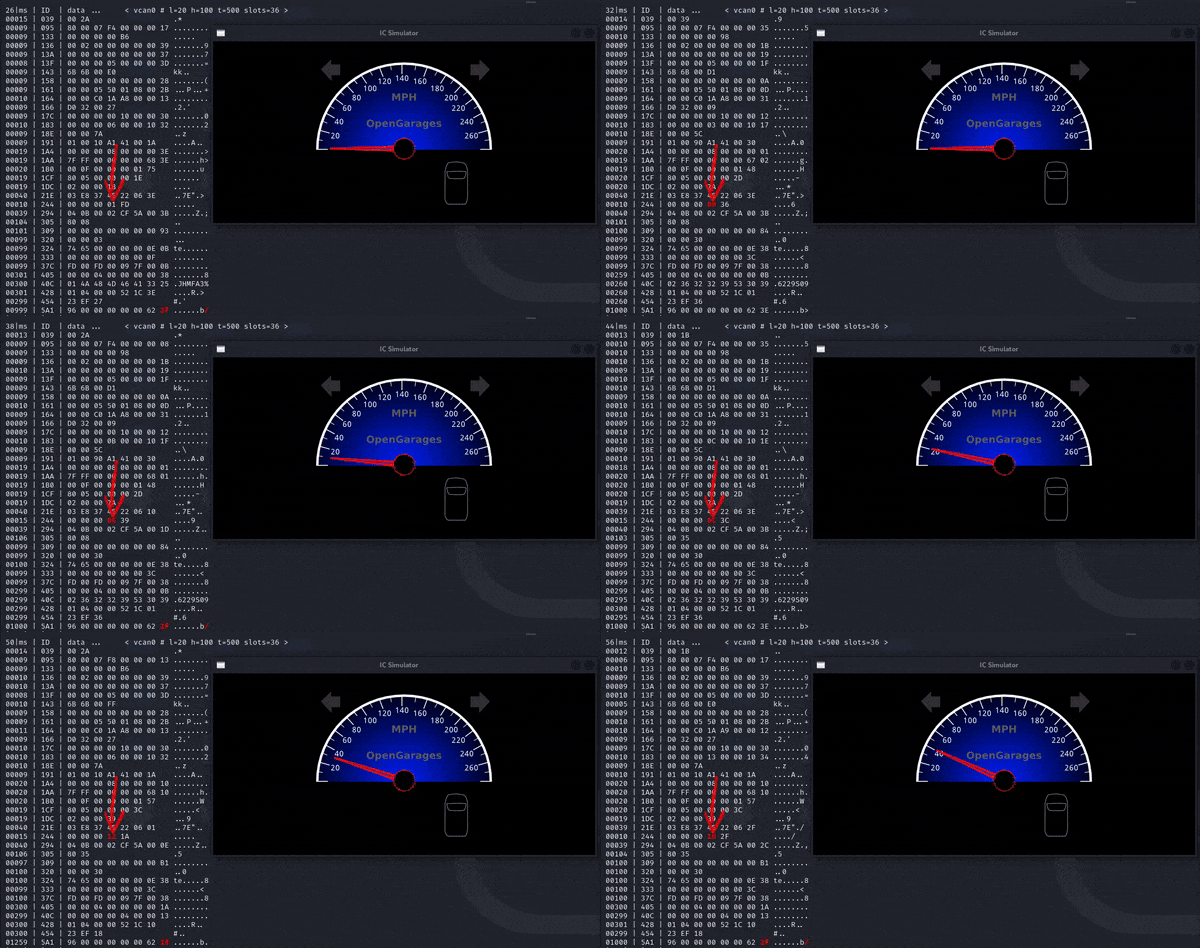
Congratulations. You just sniffed your first command. Now I will teach you a very powerful set of commands.
We’ll be using candump to dump the specific data of this ID, and perform a replay attack where we send back those exact frames.
Execute the following command, and then start accelerating your car.
candump vcan0,244:7FF -lWhat does this command do?
It dumps all the packets related specifically to ID 244 where 7FF is just a filler.
Go back to the terminal and press ctrl+c
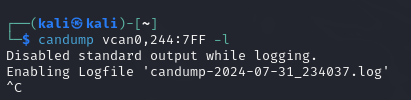
You will now have a log file with the can messages from ID 244
cat { name_of_log_file }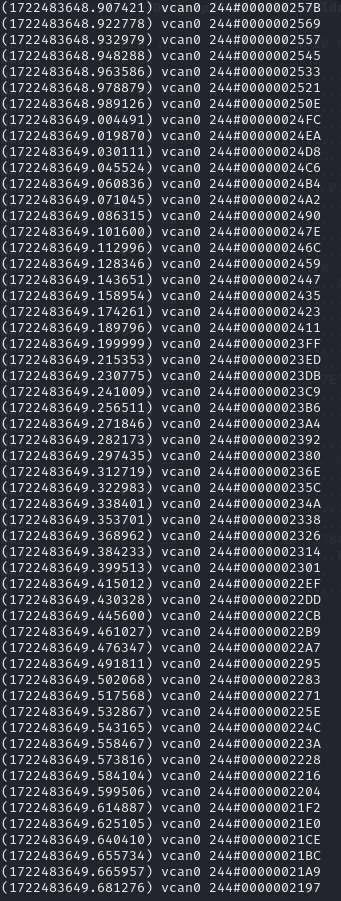
If we scroll up and pay attention to the right we can see the bits regarding acceleration going down in size, as they should.
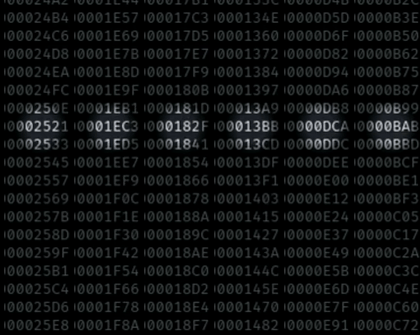
Now to the fun part, let’s send the data back and accelerate the car.
canplayer -I { name_of_log_file }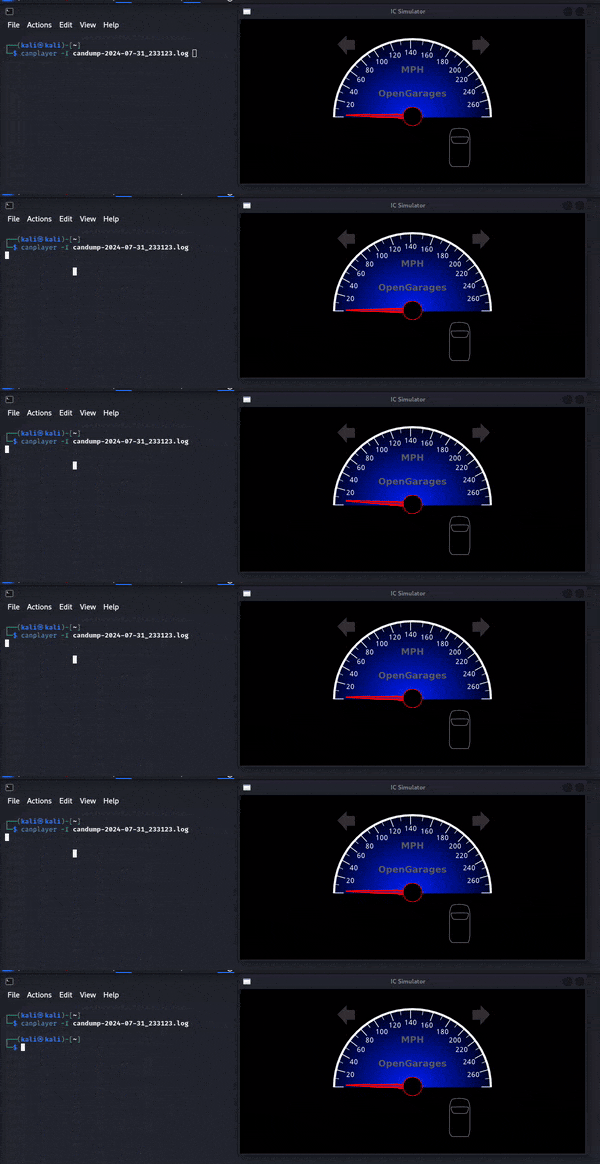
I want you to get just as excited as you would in real life. You just hijacked the CAN bus and sent out your own command to the car.
The speedometer is glitching because the controls app is also active, telling the speedometer that it should be at 0. If you want to see a smooth acceleration curve, close the program.
You can play around and see what each command does, for example, here are the commands to open and lock the left side passanger door
cansend vcan0 19B#00000B000000
cansend vcan0 19B#00000F000000
The structure is
candsend vcan0 <can_id>#{data}Using Wireshark to analyze data
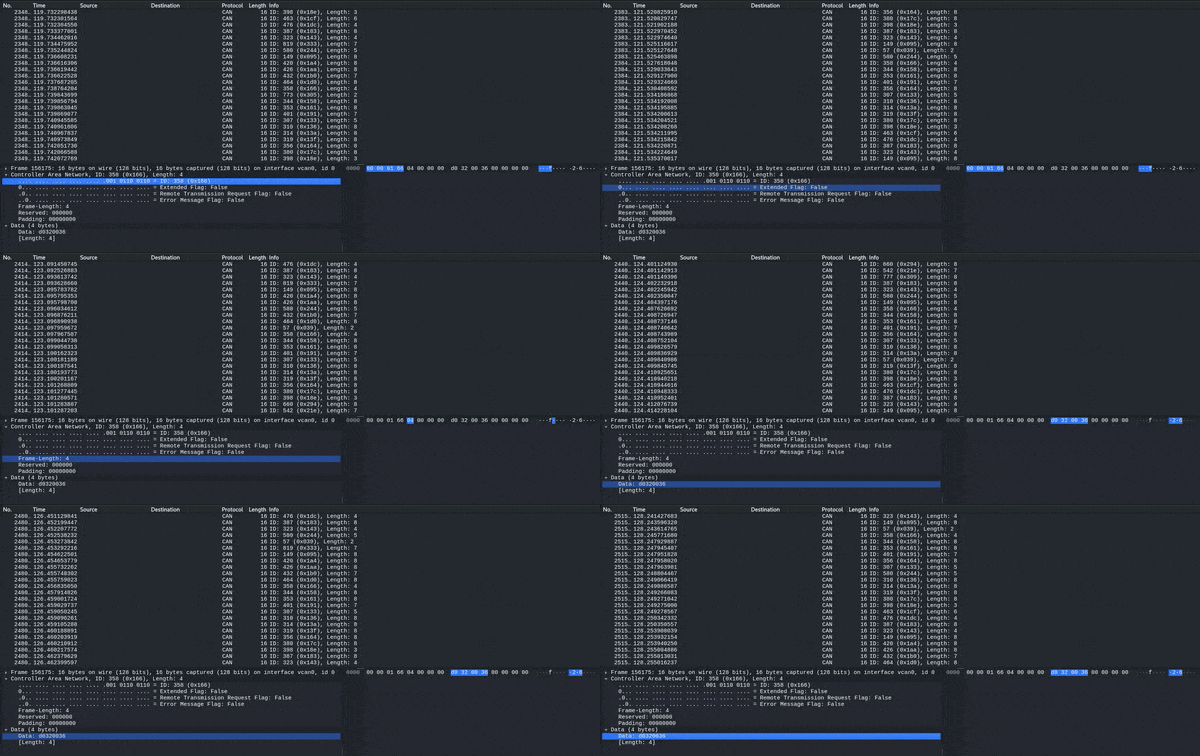
I won’t go too in-depth with Wireshark. But, if you know networking, Wireshark will explain each section of the data packet.
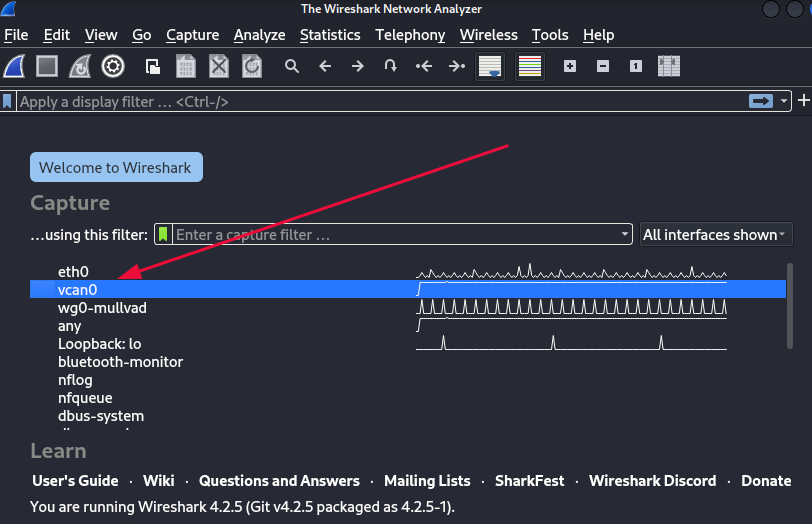
Open up Wireshark and choose the vcan0 interface
You can click on any packet and Wireshark will dissect the data packet into each section
Upgrading to SavvyCAN
What is SavvyCAN?
SavvyCAN is a GUI tool for reverse engineering. It can sniff and send CAN messages. It does what we did with can-utils (and more), but in a more versatile GUI tool.
How to install SavvyCAN?
Go to the following link and download the AppImage for it: https://github.com/collin80/SavvyCAN/releases/
Scroll down and make sure you get V213, it’s stable from my experience. The Development Build has given me issues with sending messages.
If you have any issues with saving or loading log files, or any issues in general I have a post detailing how to compile SavvyCAN from source:
SavvyCAN Installation Guide: Building & Compiling from Source
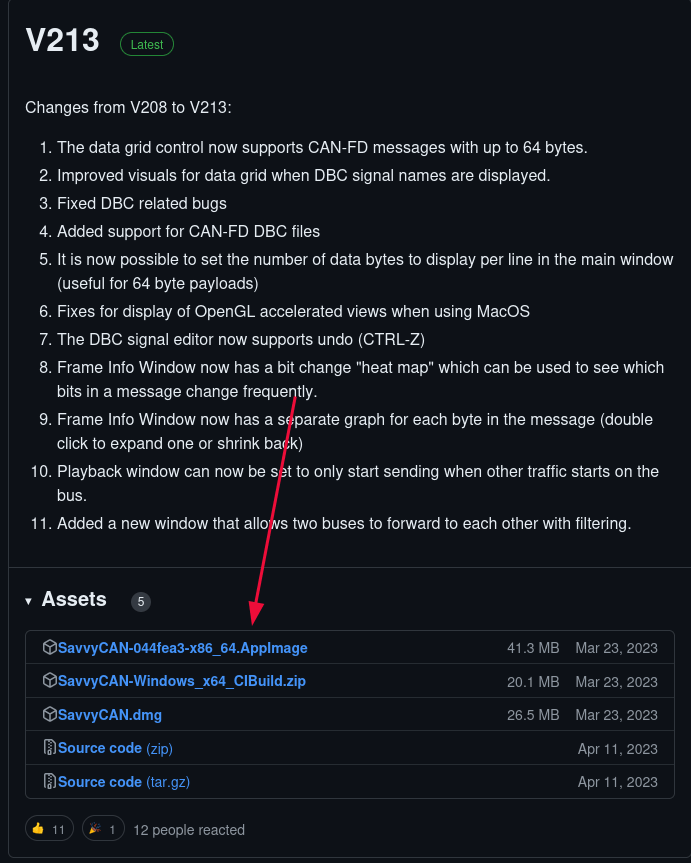
Once it’s downloaded, open a terminal in the Downloads folder and type the following commands:
sudo chmod +x { name_of_app_image }
./{ name_of_app_image }
Using SavvyCAN
- Click on “Connection” in the top right and then “Open Connection Window.”
- Click on “Add New Device Connection.”
- Select “QT SerialBus Devices”
- SerialBus Device Type as “socketcan,” NOT “virtualcan”
- It should automatically select vcan0
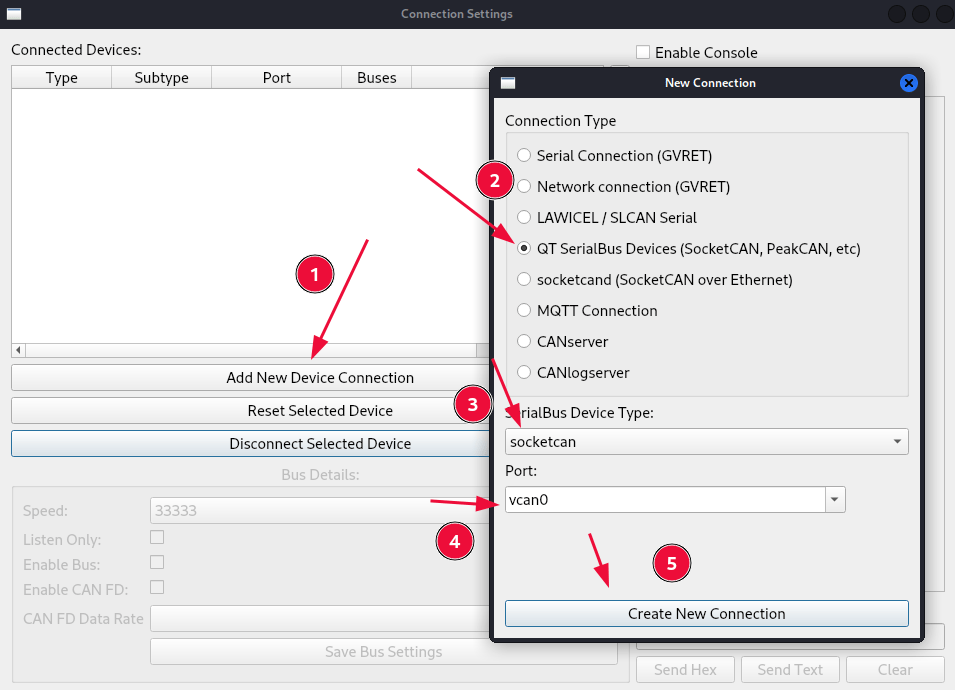
As soon as you do that you should see data flying out
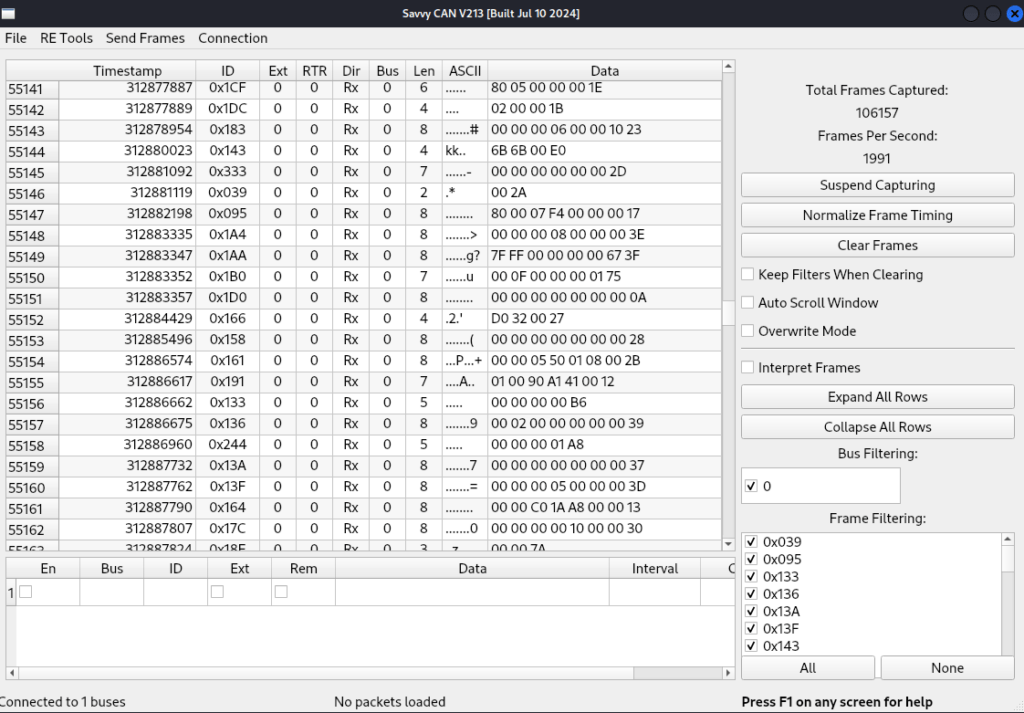
If we want to get our sniffer back, for example:
Click on RE Tools and then sniffer
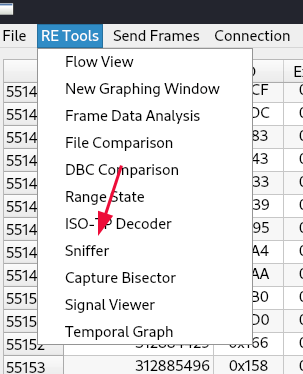
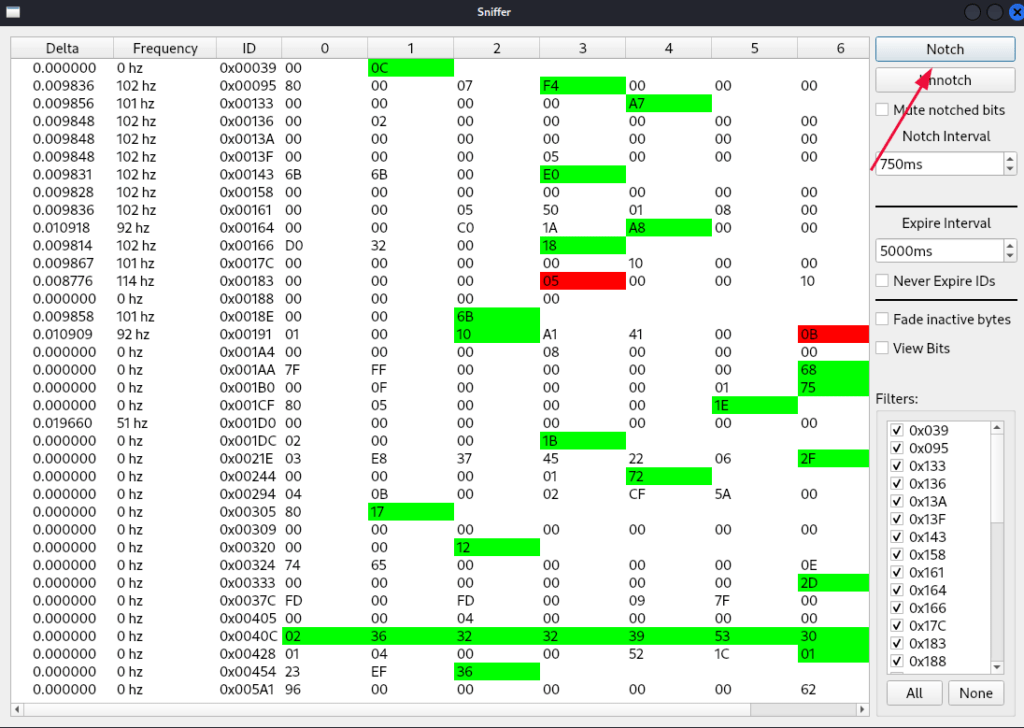
We are now in the same interface as can-utils but utilizing a GUI. You can press the “Notch” button and you’ll be able to do the same thing as sending a “#” symbol.
Now let’s do our acceleration trick once again
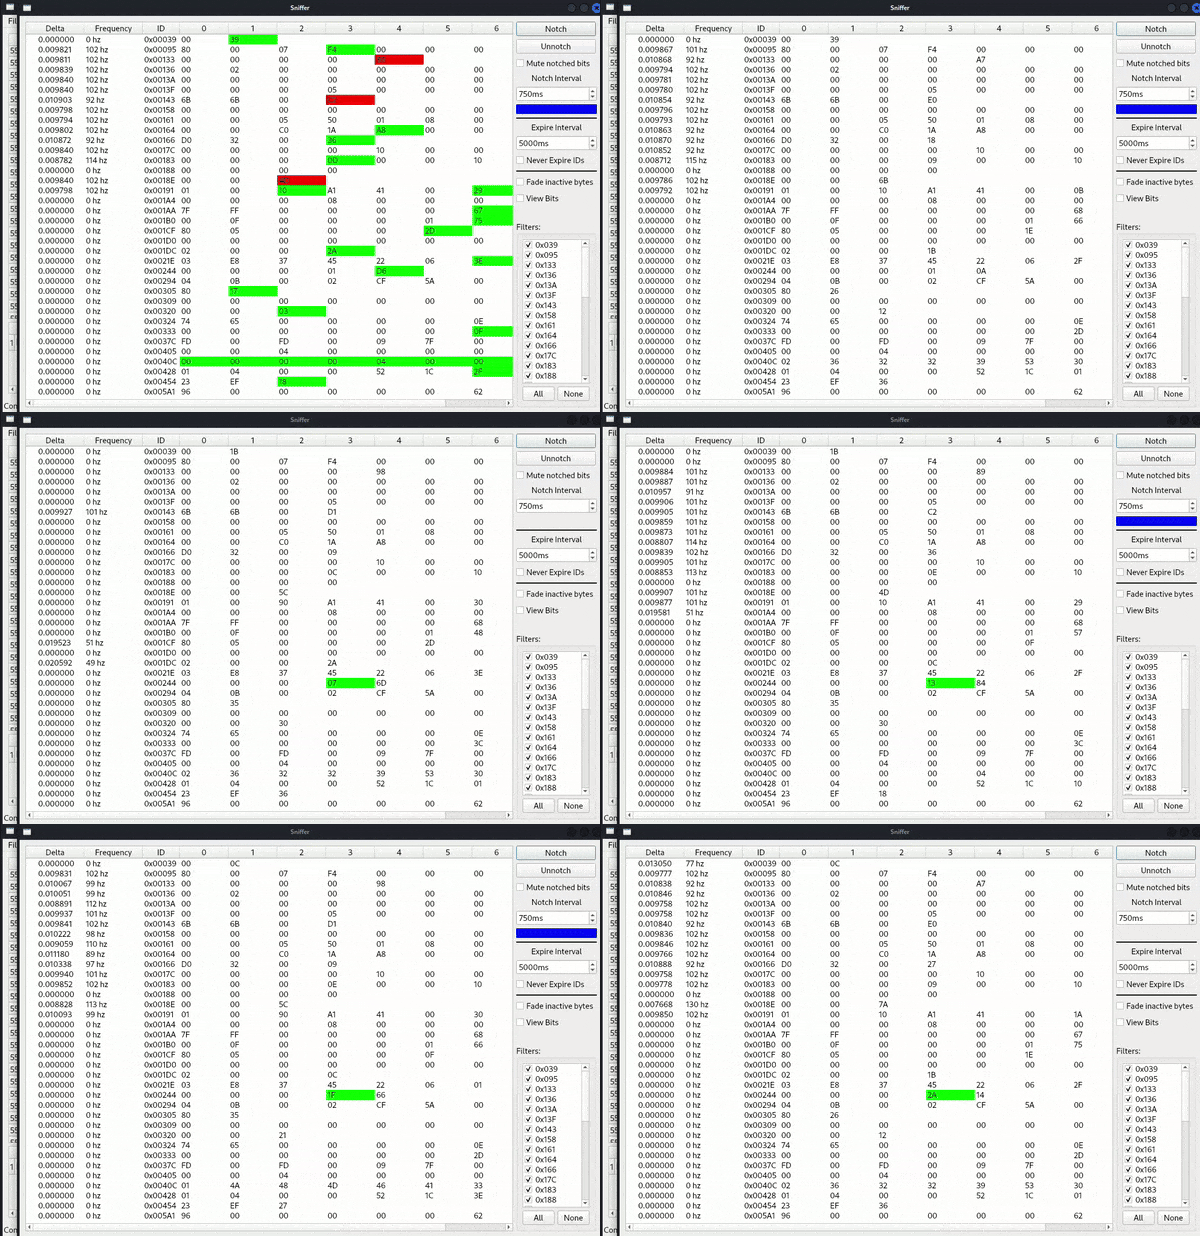
You can see ID 0x00244 at byte 3 go up.
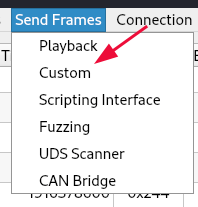
If we want to send out messages, go to “Send Frames” and click on “Custom”.
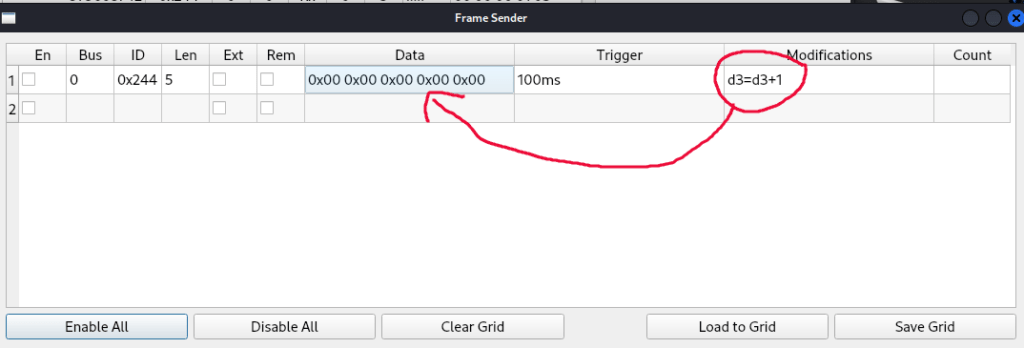
This is the structure of the message we want to send to accelerate, where:
- En (enable): Click this to start sending out messages.
- Bus: The bus we’re sending on.
- ID: The ID that we want to send to.
- Data: The data we are sending.
- Trigger: This is what will cause the message to send, setting it at “100ms” means that every 100ms the message will send. This can become a script where you send messages based on other information.
- Modifications: How you’d like to modify the data, for example, here we are adding 1 to byte 3 every 100ms so that we are accelerating
Tick the box in the left and you’ll see your car accelerate
This is as far as I’m going to go with SavvyCAN as it’s a very complex piece of software. You can even graph data, which is why it deserves it’s own post. But hopefully you learned the basics to get you started.
You can check out the documentation here
Conclusion
Congratulations. You’ve just hacked your first virtual car and learned how to sniff and send CAN bus messages.
This is the foundation for real-life car hacking, so keep it in your back pocket. We set up a CAN network interface, simulated a car with ICSim, sniffed CAN traffic, and sent our first commands. We also explored SavvyCAN for a more advanced GUI approach.
Thank you for reading. I trust this guide has proved useful to you.
More Resources
If you didn’t understand something or you need some help, we have our own Discord community and I currently offer free coaching.
You can also leave us some feedback with what you did not understand and we will make sure to correct it.