Welcome to Logos Red, I go bylogos and:
Want to start hacking hardware devices? Routers, car infotainment systems, media players, and smart home gadgets are essentially mini-computers, often running on Linux.
Just like exploiting a known CVE in an Apache server, you can do the same with a hardware device. The process is similar: find a vulnerability and exploit it. Yet, it also involves some electronic tweaks that I’ll teach you.
I’ll be hacking a router in one of my upcoming posts and you’ll be able to see how the steps are exactly put into practice.
My Promise
This post will finally end your meaningless search for a valid answer, and you will leave with a better understanding of hardware/ IoT hacking.
If there are still any questions left, let me know so I can add it to help the next person who will arrive here.
My Goal
To help you improve in less time than it took me and to make sure you leave with what I promised.
I want you to join our community and for this to be a place that you revisit often.
What is the goal?
Before we start our journey, we need to know our destination as penetration testers:
Administrator or Root access.
That is ultimately what all penetration testing leads up to. Once we have administrator (root) access we have full control over the device and we can do anything with it. Delete all the data, repurpose the device, that is when we truly own it.
What I really want to get into your mind is that almost everything with an IP address is a computer; it has a kernel, a filesystem. Just like any of the computers you own.
- Sony’s PlayStation: Runs a version of FreeBSD, has a kernel, a filesystem.
- Microsoft’s Xbox: Runs a version of Windows, has a kernel, a filesystem.
- Car Infotainment Systems: Often run a version of Linux, have a kernel, a filesystem.
- Home Routers: Usually run a version of Linux, have a kernel, a filesystem.
Any time you’ve seen a rooted android phone, a modded PlayStation/Xbox, that’s all it amounted to:
Getting a root shell on the device through exploitation.
Here are some examples of shells where you wouldn’t normally expect them:
- A Mazda Infotainment System Root Shell courtesy of Kris Occhipinti.
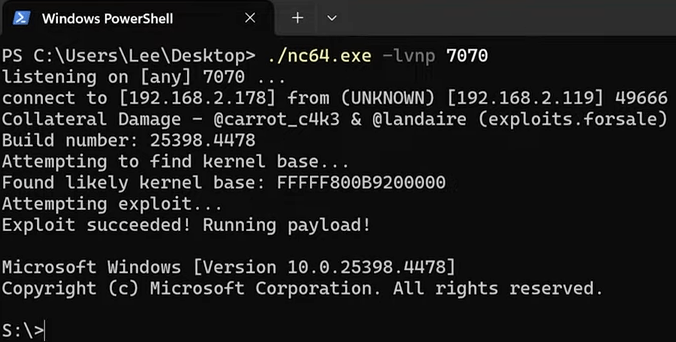
- Xbox One Reverse Shell ( Collateral Damage Exploit) courtesy of Modded Warfare.
Around 70%-80% of IoT devices are running Linux, 10%-15% Windows for IoT and the remaining 5%-10% run proprietary or so.
These are rough estimates, and the exact figures can vary.
The landscape is vast and complex. Despite being based on the same OS, the modifications made to the firmware/hardware makes it sort of proprietary. So I can’t teach you a single method to hack any hardware device. Hacking is a creative game, a game in which you have to think outside of the box.
I will show you some paths to take when it comes to unprotected small IoT devices. Devices such as routers, infotainment systems, cameras, etc.
Finding zero-day exploits in complex hardware such as an Xbox or a PlayStation requires an absurd amount of effort. It took over 10 years for the Xbox One to finally be exploited as an example.
What tools do I need?
To get started, here are the basic tools that you need as a beginner in order of priority and price; I will explain how you’ll use them later. These are not affiliate links, you are free to buy from wherever.
- A multimeter: I would advise you to get one. It will help you diagnose issues with connections and to see what pins do what.
- A soldering iron: Most boards you buy will lack header pins. You’ll have to solder them on. Don’t worry, soldering isn’t that hard, and an iron is cheap.
- Soldering wire: To solder, you will need some soldering wire. I recommend 0.7 – 1 mm, flux core, unleaded. Here is a video from Veritasium to convince you about lead.
- UART Adapter: I’ll explain this shortly. Think of it as a gateway to the debugging and diagnostic interface on devices. Many versions exist, like the FTDI and PL2303. While they might seem complex, they all perform the same function. They simply contain different chips from different companies.
- Flux: If you buy soldering wire with a flux core, you might get away without this. But, I still recommend it. It helps the solder stick better to surfaces and makes your job easier.
- Helping Hands: No, I’m not talking about another human. I’m talking about a tool that holds your hardware while you solder. This tool, for me, is a must-have, but really it’s about comfort.
- Universal Programmer: If you ever pull a NAND chip off of a board this is what you can use to read and rewrite the data. This could be the first on the list but they’re expensive. Not recommended for a beginner to buy unless you’re really passionate.
Of course this list could be expanded with tools such as an oscilloscope or a logic analyzer but for starting out I recommend you to stick with the basics.
First point of entry (Finding or Developing Software Exploits)
I’ll mention once again, we are dealing with small computers. Just as you’d exploit anything else you can go onto exploit-db.com and search for your device. As an example:
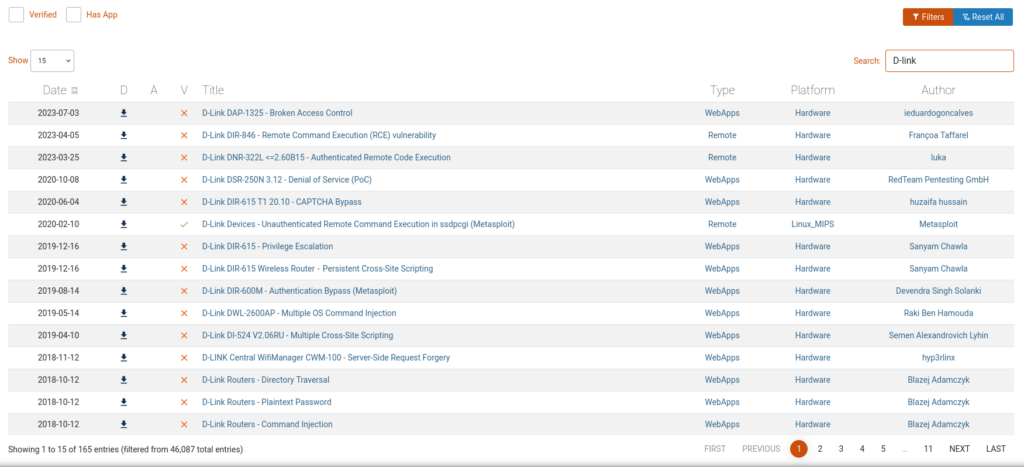
You can see that we have RCE vulnerabilities which could give us a reverse shell. If your hardware/firmware is right you can really just exploit it as such. See the POC and replicate the steps, then run Linpeas and see if you can escalate to root. Doesn’t differ from your average CTF does it?
You can just as well do bug bounty and try to find exploits yourself. A router’s interface is just a web server which allows you to interact with it.
I know, easier said than done.
What I’m trying to get across is for your mind to shift to a different perspective of seeing these IoT devices. They’re not much different from your usual exploitable devices.
Second point of entry (Getting a UART shell)
Now we’re getting more into hardware hacking, we’ll talk about getting a UART shell.
What is UART?
It’s simply a protocol designed for electronic devices to communicate, you have a TX (transmit) cable and an RX (receive) cable.
This is where we’ll use the UART Adapter I talked about before. We will use it to communicate with the debugging/diagnostic interface
Sometimes, IoT devices have a leftover debugging interface after manufacturing. Usually they’re not marked, but sometimes they are, as in the case of this D-Link router I own:
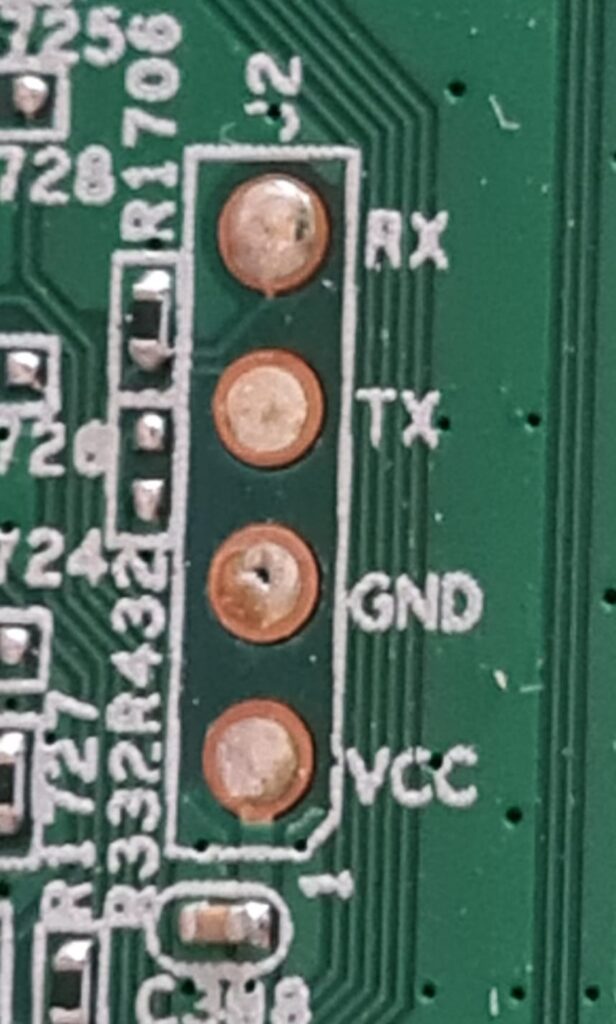
To find a UART interface we look for 4 pins next to each other, if they are marked, they’ll be like so:
- RX: Receive (the pin that the device receives data on)
- TX: Transmit (the pin that the device sends data on)
- VCC: Voltage at the common collector, which is voltage that has been regulated at 5V or 3.3V
- GND: Ground
If not:
How to find the pinout?
- GND: You need to find continuity between your ground and a real ground.
- Put your multimeter into continuity mode and find a ground point. A wireless antenna is usually connected to ground, or look for the power connector and choose one of the soldering points. Guess one of the pins on the UART connector and your multimeter should beep, and you know you’ve found your ground.
- VCC: Now, with a multimeter probe on the ground from before guess another pin and turn your device on. If it’s a stable 3.3V/5V, that is your VCC.
- TX: With a multimeter probe on the ground select another pin, and if you see the voltage fluctuate, that is usually TX.
- RX: Now this one is harder to find out. It’ll look exactly like VCC since it stays at the same voltage due to it not being used. You just have to guess and if you can’t send any data, flip the connections between VCC and RX.
Once you’re sure of your pinout, you can move on.
Next, solder on some header pins. Then, connect them to your USB-to-UART adapter, find the baud rate, and you’re set.
I won’t go in-depth on how to do everything since this section deserves its own post and I will make a tutorial on how I’ll hack a D-Link router I own. You can then follow the steps from that post.
Sometimes the devices give you a root shell directly, and sometimes they give you a very limited one. It depends on the manufacturer.
Third point of entry (NAND Reflashing)
This one is still quite easy but requires extra hardware such as the Universal Programmer I talked about before. With this, you’d be able to pull off the NAND flash memory chip and read or write the data.
For example, you can pull off the chip and rewrite the root user’s password in /etc/shadow or chroot into the Linux filesystem.
For this you’d need to:
- Find the NAND chip on the board.
- Use a hot air station to pull the chip off.
- Use a universal programmer to read and write the data on the chip.
- Reattach the chip onto the board.
Additional Entries (More complex)
Hardware hacking is vast, those were just some of the simpler universal ways of getting a root shell on really an unprotected device. You have to remember that it all depends on the hardware/software, get as creative as you can.
You can’t summarize hardware hacking into a few points, you also have:
- Voltage Fault Injections
- Clock Glitching
- Electromagnetic Fault Injection
- Probe Attacks
And many more, never mind the creative, specific methods.
It’s a vast and exciting landscape for anybody who is into hacking and you can dive in as deep as you’d like. I’ll be doing some of my own projects related to hardware.
Conclusion
We’ve explored how hardware devices like routers and smart home gadgets are essentially mini-computers. They can be hacked in the same methods you are used to. But with some electronic twists.
Just like with any computer, finding and exploiting vulnerabilities is key. We’ve covered the basic tools you’ll need, like multimeters and soldering irons. We’ve also introduced methods, like UART and NAND chip manipulation, to gain shell access. Every device is a bit different so be creative and persistent. They are your best friends on this journey.
Thank you for reading. I trust this guide has proved useful to you.
More Resources
If you didn’t understand something or you need some help, we have our own Discord community and I currently offer free coaching.
You can also leave us some feedback with what you did not understand and we will make sure to correct it.