
Welcome to Logos Red, I go by logos and:
Do you want to intercept unencrypted LTE traffic using a HackRF?
In this post we’ll take a look at the radio world that surrounds us and how we can use it to our advantage as ethical hackers to track individuals and find potential vulnerabilities.
Disclaimer: Intercepting telecommunications can have serious legal and ethical implications. Always ensure you do all your testing on your own infrastructure and within a Faraday cage. Use your skills responsibly.
My Promise
This post will finally end your meaningless search for a valid answer, and you will leave knowing how to intercept 4G LTE using a HackRF.
If there are still any questions left, let me know so I can add it to help the next person who will arrive here.
My Goal
To help you improve in less time than it took me and to make sure you leave with what I promised.
I want you to join our community and for this to be a place that you revisit often.
Requirements
- A HackRF: https://opensourcesdrlab.com/products/h4m-receiver-and-spectrum-analyzer
- DragonOS Focal: https://cemaxecuter.com/
Alternative to DragonOS
I highly recommend DragonOS for anyone new to radio hacking. LTESniffer can be compiled from source, but it’s very tedious. Which is why I recommend a Docker container running Ubuntu 22.0.
LTESniffer comes preinstalled with DragonOS, no need to compile from source.
I haven’t seen a big performance difference in using LTESniffer in a KVM DragonOS VM vs a Docker container. So, I still recommend DragonOS.
To start up a docker container and install LTESniffer you can use the following command:
sudo docker run -d \
    --name LTESniffer \
    --device=/dev/bus/usb/XXX/YYY \
    -v ltesniffer_data:/data \
    ubuntu:jammy tail -f /dev/null
Where you need to replace /XXX/YYY with your HackRF. Which you can find with the command:
ls /dev | grep hackrf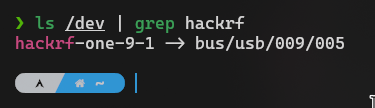
You can then jump within the Docker container with the following command to follow the documentation:
sudo docker exec -it LTESniffer bash- Install SoapySDR: https://github.com/pothosware/SoapySDR/wiki/BuildGuide
- Install Soapy HackRF: https://github.com/pothosware/SoapyHackRF/wiki
- Install LTESniffer: https://github.com/SysSec-KAIST/LTESniffer
Make sure you follow the LTESniffer GitHub to a tee and that you compile everything from source, starting from SoapySDR all the way to LTESniffer.
How are we performing the attack?
Magnificent radio signals are always surrounding us without us even knowing. What is stopping us from eavesdropping and seeing what they contain?
Absolutely nothing.
Which is simply what we’ll be doing.
Although most LTE traffic is encrypted ,there are certain streams of data that can be demodulated that can lead to location tracking and privacy issues.
Big emphasis on “demodulating”; we are not cracking any data.
- Demodulation refers to the process of converting radio signals from cell towers into digital data that a device can understand, allowing for data transfer.
- Cracking in this context would mean breaking LTE security protocols to intercept or access data without authorization, such as attempting to bypass encryption used to protect LTE communications.
You can watch the official conference video showcasing LTESniffer here:
To do so we’ll need 3 “ingredients”:
- The frequency at which our cell tower is operating.
- The CID of the tower
- The nRB of the tower.
Don’t worry, I’ll explain these terms as we go along.
Configuring phase
Make sure you give adequate processing power to your DragonOS virtual machine, or better yet, run it bare metal on a USB stick.
You can run DragonOS from a live USB; no need to install it locally.
For the HackRF make sure that your antenna is of adequate length for the frequency you are targeting which will be around +-2GHz.
You can use an antenna calculator https://southwestantennas.com/calculators/antenna-wavelength
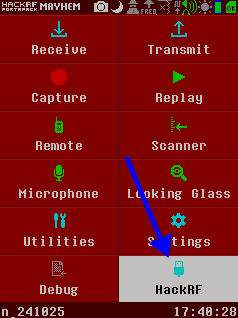
And if you are using a Portapack, make sure it is in HackRF mode.
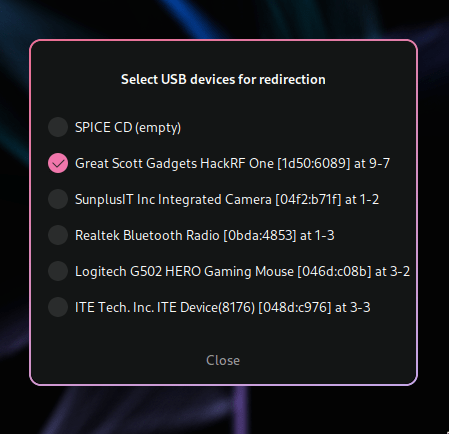
And then redirect the HackRF to your virtual machine if you’re using one.
Finding out what frequency we are operating on.
To start eavesdropping on a certain frequency, we need to know what frequency to eavesdrop on.
To speed up the process, we can find the frequency directly in the OS of a mobile phone. This depends on what phone you are using so Google is your friend.
If not you can use the following website to find the frequencies used in your country https://www.frequencycheck.com/countries
For example on a Samsung device you can type the following in the phone app:
*#0011#Which will land you on the following page:
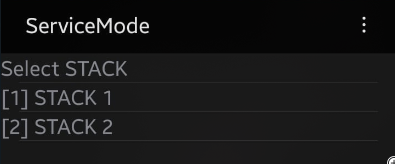
Choose either of the stacks depending on your SIM card location and you’ll be met with a lot of data.
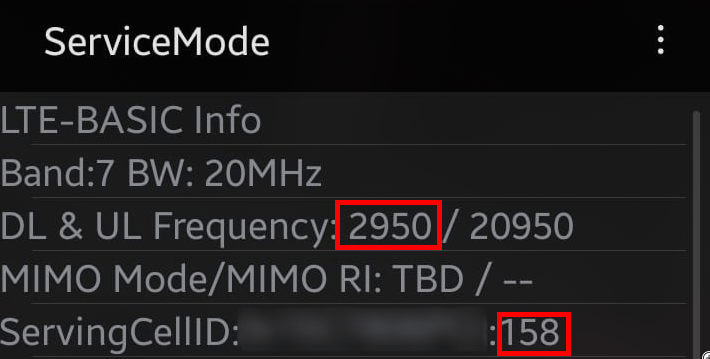
What we want is the DL (Downlink) frequency and the CID (Cell ID which identifies a cell tower within a network.)
The frequencies are specified using the EARFCN standard, which is a unique numbering system.
To interpret these as normal frequencies in MHz, we need to convert the EARFCN values.
We can do so using an EARFCN calculator: https://www.sqimway.com/lte_band.php
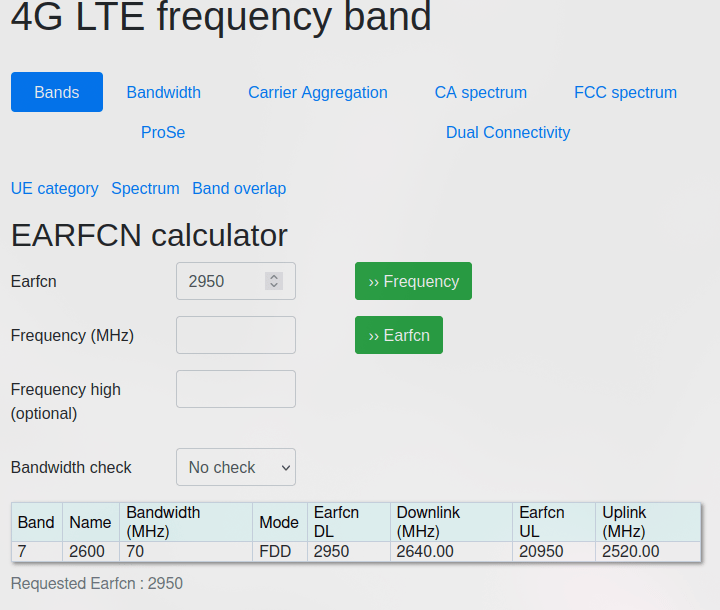
We now have 2 ingredients: the CID and the frequency.
Which should also match with the band. You might either get the mode as “FDD” or “TDD” which are simply two different standards.
FDD (Frequency Division Duplex)
- Separate Frequencies: FDD uses two different frequency channels—one for sending (uplink) and one for receiving (downlink).
- Simultaneous Data Flow: Because of these separate channels, data can be sent and received at the same time.
TDD (Time Division Duplex)
- Same Frequency, Different Times: TDD uses the same frequency channel for both sending and receiving, but switches between the two at different times.
- Alternating Data Flow: Data goes in one direction (uplink) for a short time, then switches to the other direction (downlink), and continues alternating.
Finding a cell tower
Now that we have a frequency, we can start scanning for cell towers operating within that frequency.
We now turn to our DragonOS terminal to use the following command:
CellSearch_hackRF -s <start_freq> -e <end_freq>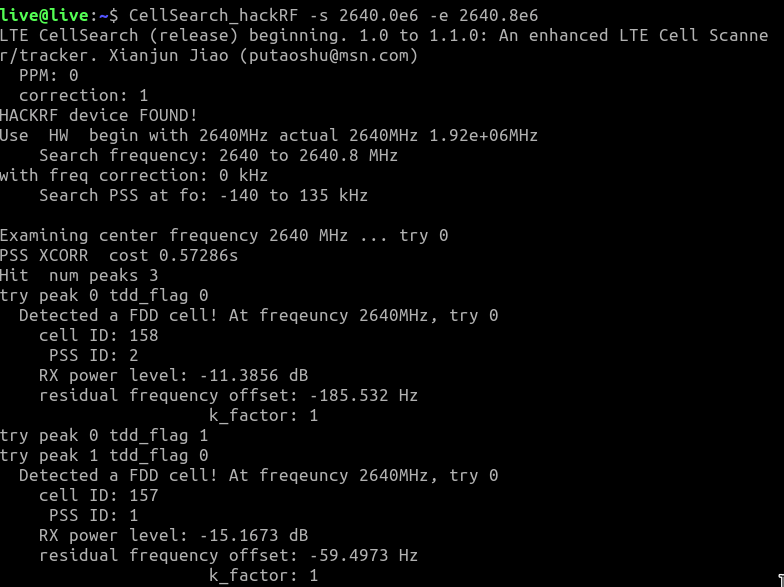
Here we will be using “e6” which is simply engineering notation for “^6” since this is MHz.
We start at the freq specified in the EARFCN calculator and move 0.8 up.
The tool will scan every frequency point up until the last point and show us the towers within that range.
Remember, your EARFCN can change often to different frequencies since 4G doesn’t operate on a single definitive frequency.

This matches what our EARFCN calculator told us.
Now we have the nRB (number of Resource Blocks which simply tell us how much data we can transfer, the higher the better). Usually 50 or 100 depending on the bandwidth.
Using LTESniffer
Now that we have all the ingredients needed, we can finally assemble our command to intercept and demodulate LTE traffic.
The command is as follows:
sudo LTESniffer -A <number_of_antennas> -W <number_of_CPU_threads> -f <freq> -I <CID> -p <nRB> -m 0 -dThe only flag not specified is -m, which is the sniffer mode.
- 0 For downlink, which is data coming from a tower.
- 1 for uplink which is data going to a tower.

If you get messages such as the following:
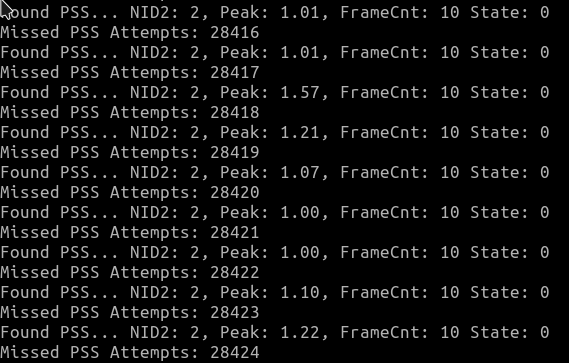
You should try another tower or a different frequency.
A PSS (Primary Synchronization Signal) is a signal sent to a device in order to sync. It might be unable to sync if the signal is too weak.
You can use a tool called LTE-Tracker_hackRF to find out the strength of a tower to know which one to use.
LTE-Tracker_hackRF -f <freq> -i 0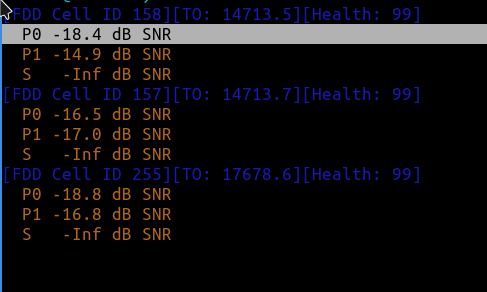
You should now start to receive a lot of data:
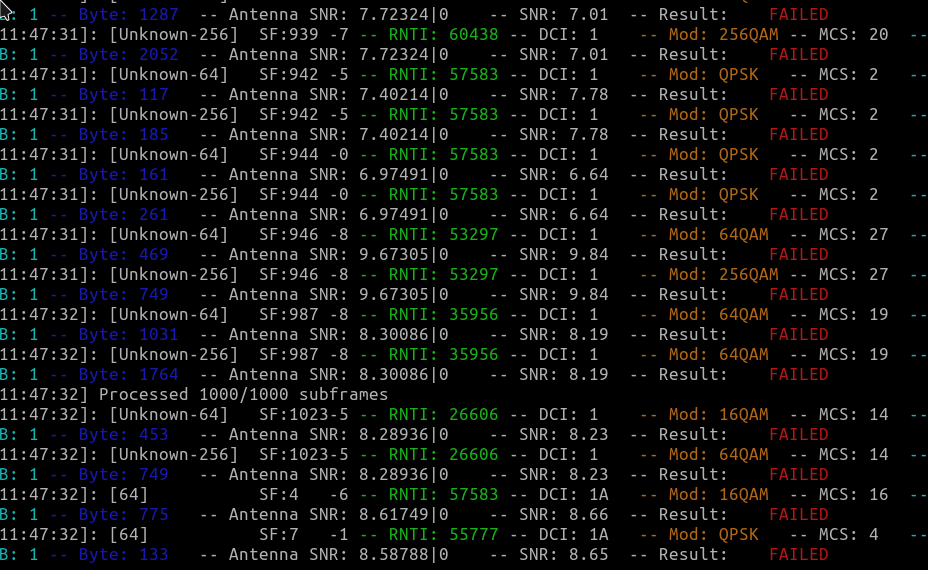
Let’s explain all of the important columns.
- RNTI (Radio Network Temporary Identifier): This number identifies a user on a network. It is different each time the user connects to a new tower for privacy issues.
- Mod: The type of modulation used. Modulation simply transfers analog data into digital data which is essential for radio transmission.
All of the other columns refer to how the signal is transmitted, a lot of radio information which you can research on your own further if you are interested.
You can stop the reception anytime by pressing <CTRL> + <C>.
The longer you leave it to run, the more it will receive and be able to demodulate.
A PCAP should be created within your current folder. You have successfully captured data if the PCAP is larger than 24 bytes.
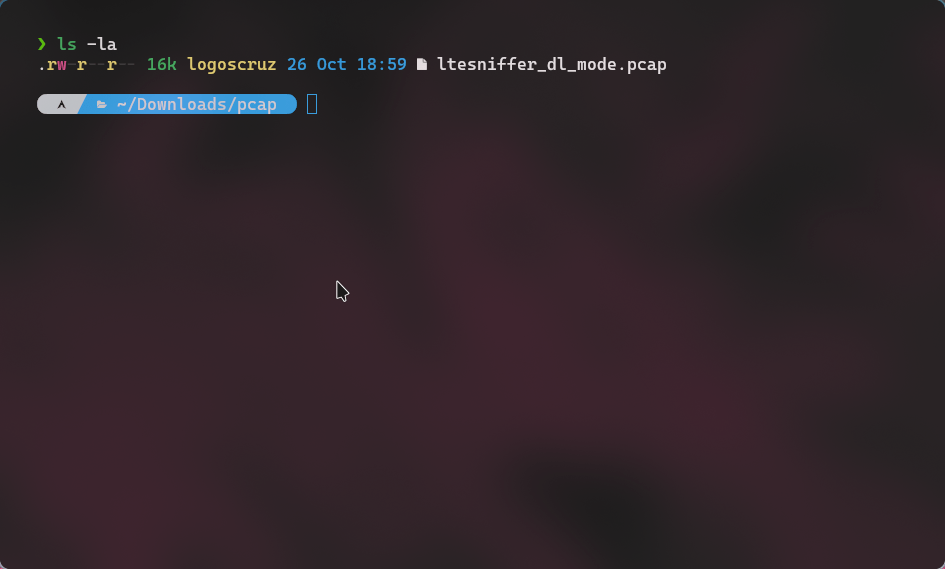
You can open said file in Wireshark but all of the data will be obscured initially.
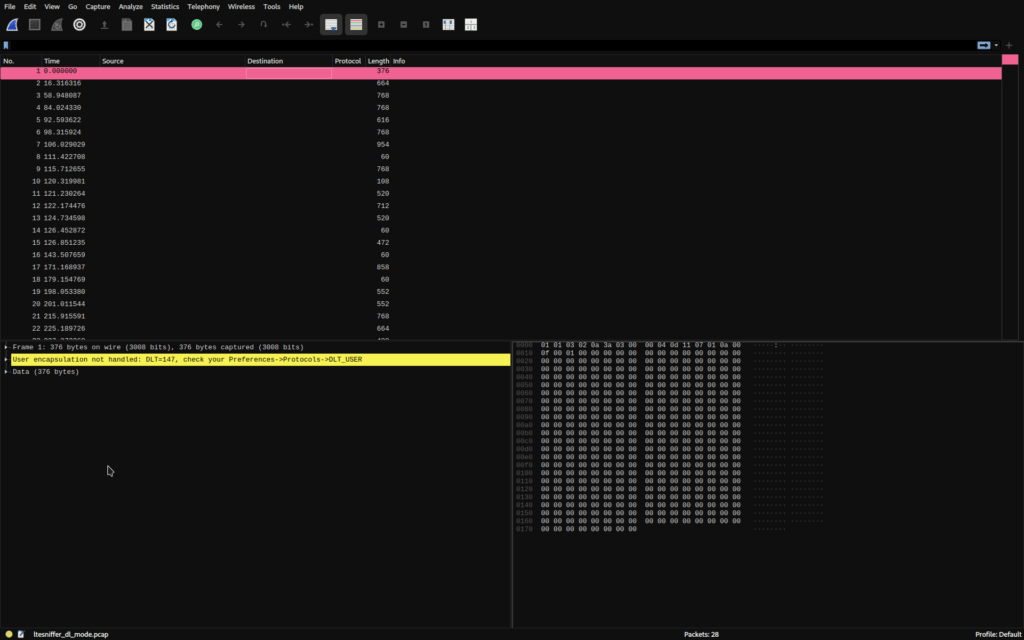
We need to tweak a few settings within Wireshark.
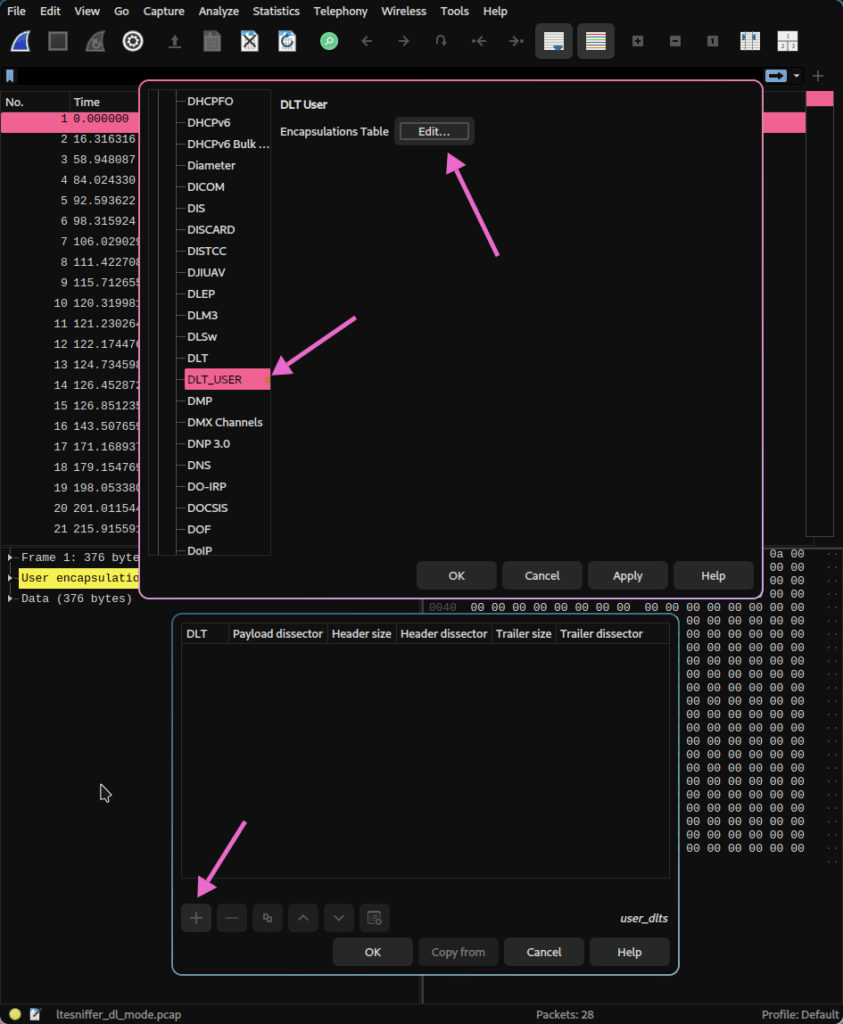
- Go to Edit -> Preferences -> Protocols -> DLT_USER -> Edit… -> +
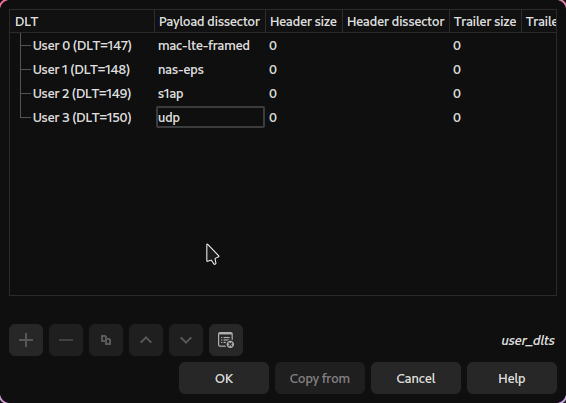
And add the following columns:
And now your data should look quite a bit different:
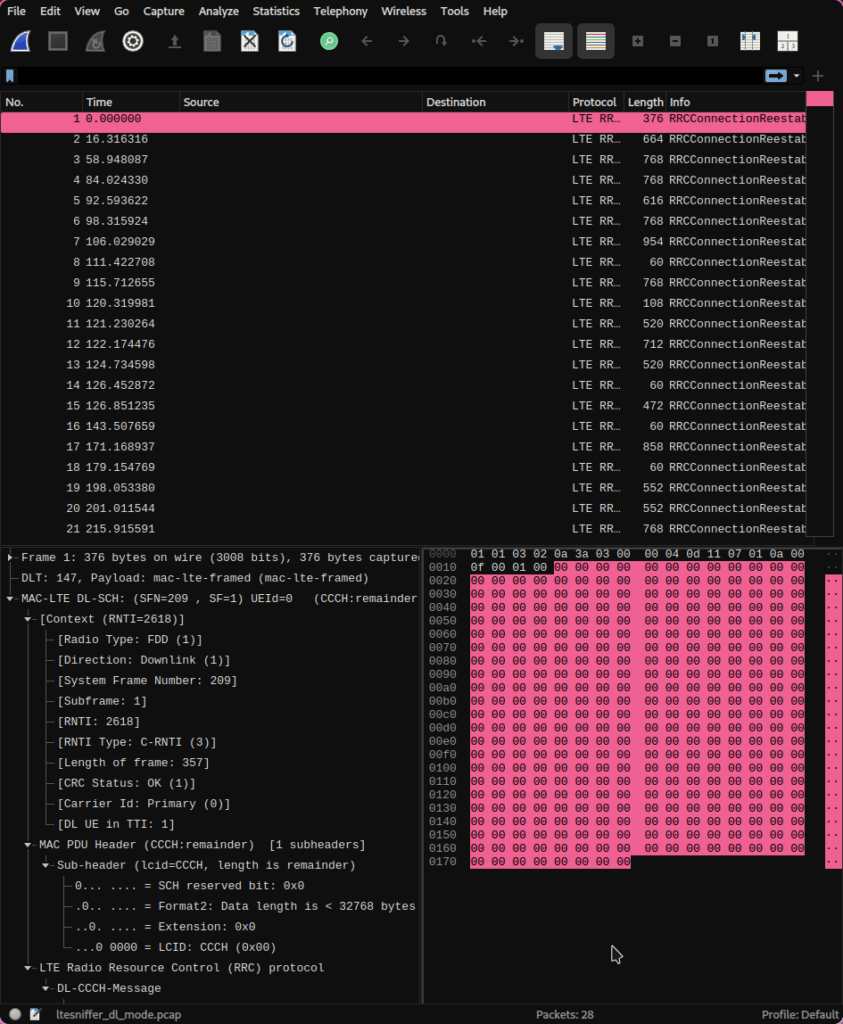
But we still have a few more settings to tweak.
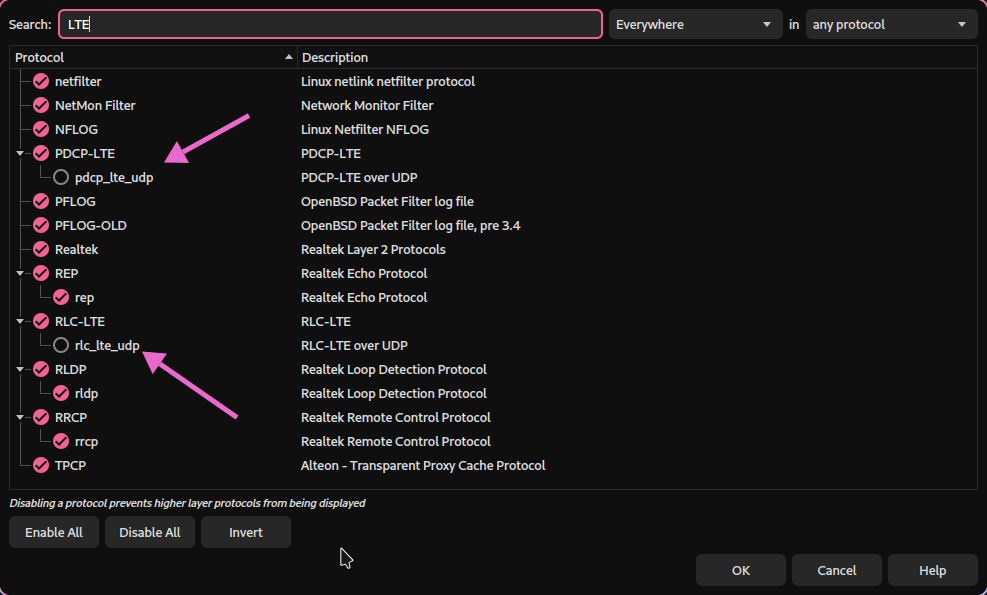
- Go to Analyzer -> Enabled Protocols… -> Search for “LTE”
And tick everything that is not enabled.
Although most of the data that you will get won’t be very insightful or useful unless you dive very deep into LTE standards.
API Security
What might be interesting is the API security mode, this is where you can snatch any IMSIs that might be flowing around in an unencrypted manner.
- An IMSI (International Mobile Subscriber Identity) is a unique number assigned to your SIM card that identifies you as a mobile network user worldwide.
An IMSI can be used to track a user as he moves across cell towers.
Your mileage may vary with a HackRF. it might be tough to get any IMSI numbers as it is half-duplex. Meaning it can only receive or only send, not both at the same time.
You can enable API security mode by adding the -z flag as explained in the documentation.
sudo ./<build-dir>/src/LTESniffer -A 2 -W <number of threads> -f <DL Freq> -u <UL Freq> -C -m 1 -z 3
example: sudo ./src/LTESniffer -A 2 -W 4 -f 1840e6 -u 1745e6 -C -m 1 -z 3
-z: 3 for turning on 3 functions of sniffer, which are identity mapping, IMSI collecting, and UECapability profiling.
    2 for UECapability profiling
    1 for IMSI collecting
    0 for identity mapping
It is far easier and more rewarding to catch IMSIs over 2G which is what I’ll be showing off in my next tutorial.
Conclusion
In this post, we covered a step-by-step process for using a HackRF to capture LTE data. Starting with the fundamentals, we discussed configuring DragonOS Focal and setting up LTESniffer to handle LTE frequencies.
From identifying the downlink frequency (DL) and cell ID (CID) on your mobile phone to finding your cell tower’s operating band with an EARFCN calculator, we made sure you had all the setup details.
Next, we moved into configuring your HackRF and tuning your antenna for optimal reception. We used CellSearch to locate local cell towers and looked at nRB values to understand the bandwidth we’re working with.
Finally, with LTESniffer, we constructed the right commands to demodulate LTE downlink signals, analyzing columns like RNTI and modulation type for useful data within Wireshark.
By following these steps, you should now have a better understanding of LTE traffic.
I thank you for reading, and I trust that this guide has proved useful.
More Resources
If you didn’t understand something or you need some help, we have our own Discord community and I currently offer free coaching.
You can also leave us some feedback with what you did not understand and we will make sure to correct it.