Welcome to Logos Red, I go bylogos and:
Want to start hacking Windows machines?
When it comes to the most common Windows-related penetration tests, you will see Active Directory coming at the top.
How common?
More than 90% of Fortune 500 companies use it. That’s how common.
In this post we’ll build our own hacking lab to better prepare ourselves for attacking these machines and servers.
I will continue this series with multiple posts on the different types of attacks that we are able to do.
My Promise
This post will finally end your meaningless search for a valid answer, and you will leave with a Windows Active Directory hacking lab.
If there are still any questions left, let me know so I can add it to help the next person who will arrive here.
My Goal
To help you improve in less time than it took me and to make sure you leave with what I promised.
I want you to join our community and for this to be a place that you revisit often.
What is Active Directory?
Simply put, it’s the whole infrastructure behind companies that creates a network of services for work or school.
There is a great post here explaining it in depth: https://www.quest.com/solutions/active-directory/what-is-active-directory.aspx
PRECAUTIONS
Make sure that you turn off your VPN.
I learned this while troubleshooting DNS issues on the server. Which involved a few hours of research, multiple macvtap and bridge interfaces, and various network setups.
Then, I realized that I had my VPN on and that it might be interfering by encrypting the DNS queries.
Make sure you check off the smallest issues first.
Setting up our home lab
I will personally be using QEMU on Linux, but the process is the same on Windows with VMware or VirtualBox.
My attacker machine will be Kali Linux, I have a post here on importing it over on QEMU: https://logos-red.com/blog/how-to-import-kali-linux-into-qemu-kvm/
Download the following Windows 11 Enterprise and Windows Server 22 ISOs and install them:
https://www.microsoft.com/en-us/evalcenter
For people using QEMU there is a great guide here: https://sysguides.com/install-a-windows-11-virtual-machine-on-kvm
It’s a really interesting process to get everything set up.
When choosing passwords throughout this guide, make sure to choose some really easy passwords to guess. Windows might stop you but just add a symbol, such as:
“longp@ssword1”
Make sure you get the “Desktop Experience” for your server, which also gives us a GUI. But the initial setup will be done in PowerShell.
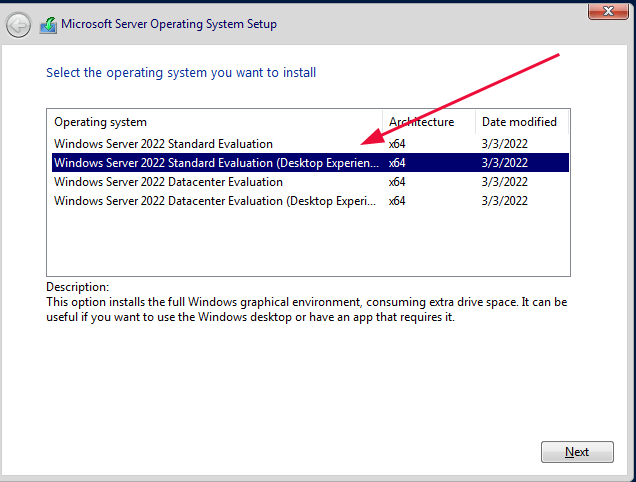
Installing Active Directory
Once you have fully installed the server, log in and open up cmd and type “sconfig”:
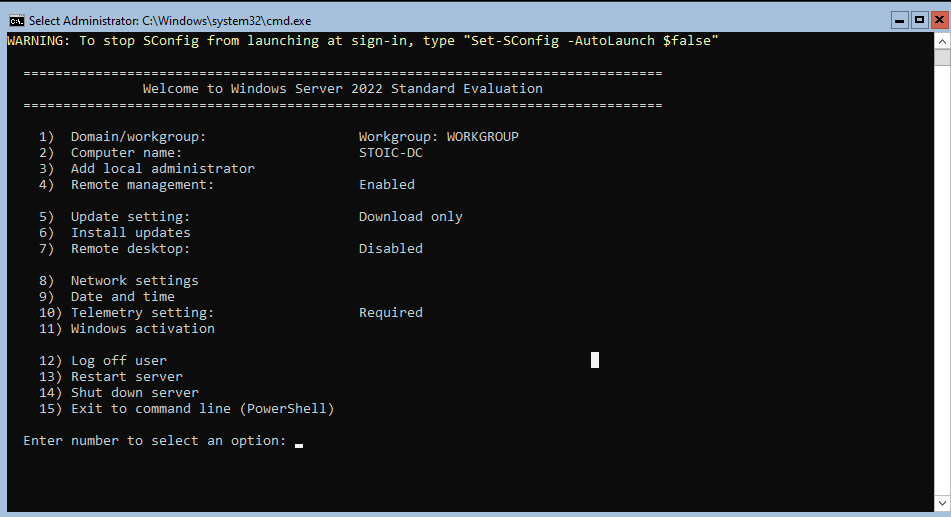
Type 2 and change your computer name to something simpler, ending in DC (Domain Controller).
After you restart, open sconfig once more, type 8 followed by 1 and then 1 to change your IP to a static one.
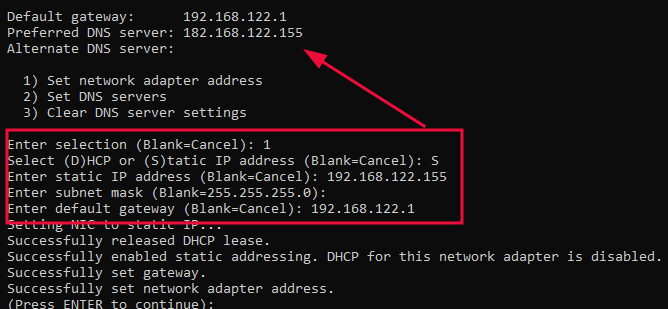
Here, make sure you change the last octet (last part) depending on the subnet that you are using with 155.
In normal words, copy the top part and replace the last with 155.
Then type 8 followed by 1 and then 2 to change your DNS settings to the static IP you set earlier.

Close the command prompt and open up PowerShell and type the following:
Install-WindowsFeature AD-Domain-Services -IncludeManagementTools
And then the following commands:
import-Module ADDSDeployment
install-ADDSForest
Put the password the same as your default one, and the domain can be anything.
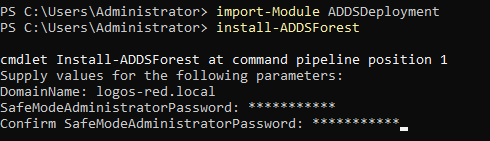
This should take a good amount of time, let it do its thing.
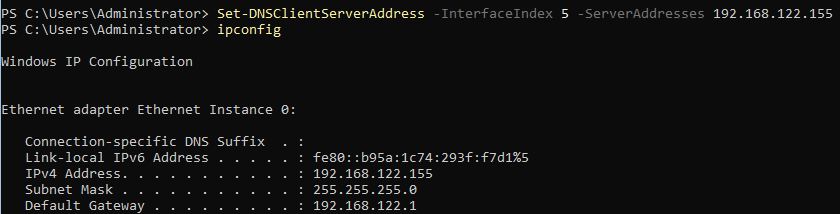
After it restarts, go back to PowerShell, we need to change our DNS settings once again:
Get-DNSClientServerAddress
Set-DNSClientServerAddress -InterfaceIndex your_interface -ServerAddresses your_static_ip
Set your interface index depending on the results of the first command.

Adding Users
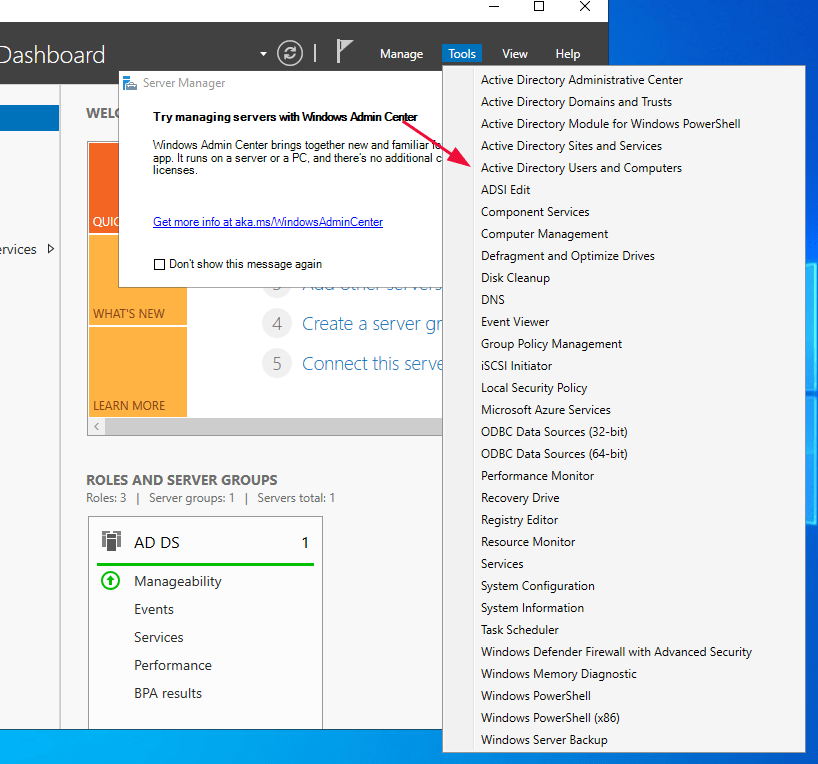
Once restarted, open up Server Manager and add a new user:
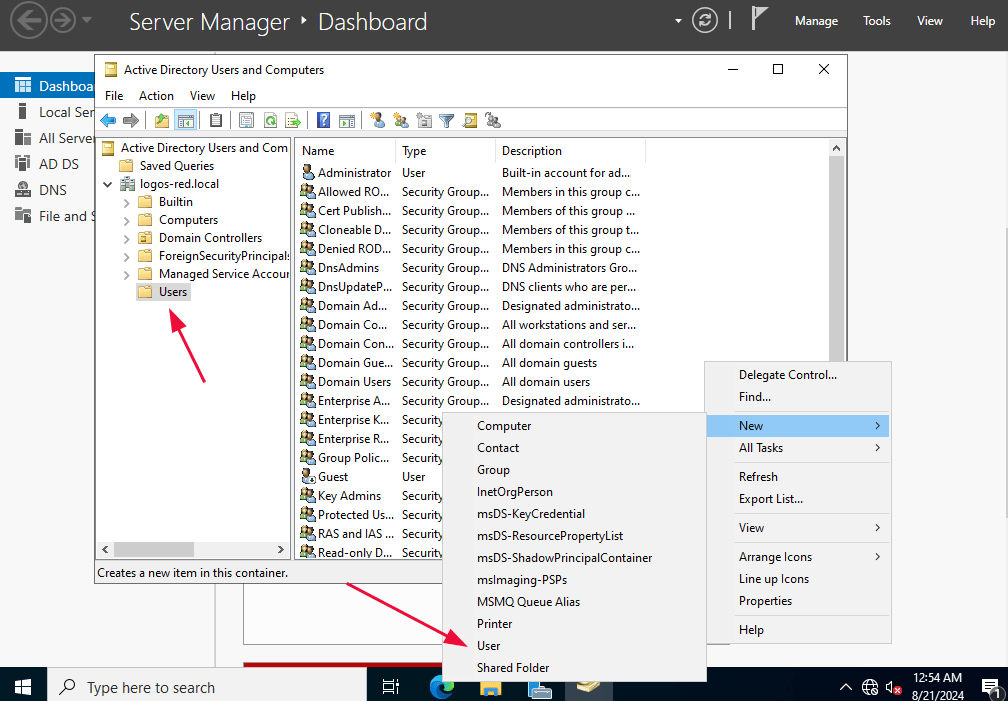
Then go to “Users,” right-click anywhere then New -> User.
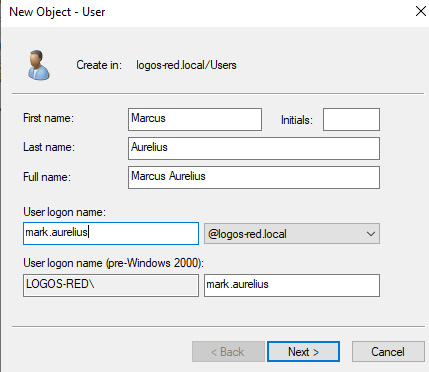
And add a user as such, choose any name you wish, but remember the logon name:
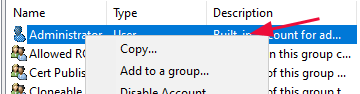
After that right-click on Administrator and then copy:
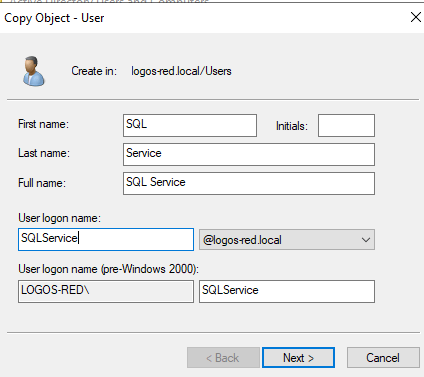
Pick another random name.
Then do it once again and set the name as SQL Service.
Adding Features and Policies
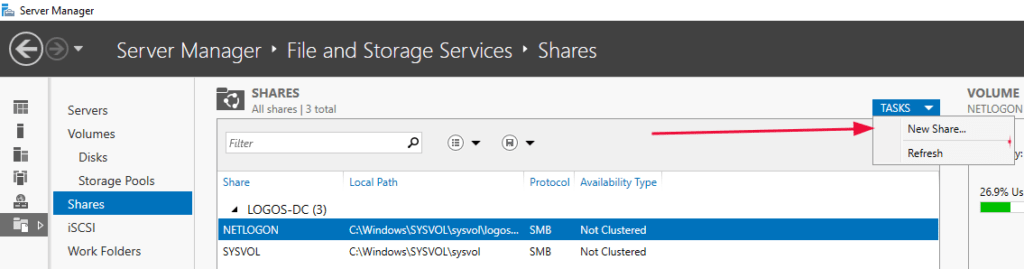
Click on “File and Storage Services” and add a share, give it any name. I named mine “secrets”.
Then run the following command in cmd:
setspn -a computer-name/SQLService.domain.local:60111 domain\SQLServiceThis will open up port 60111 for our SQLService.

Adding a certificate authority
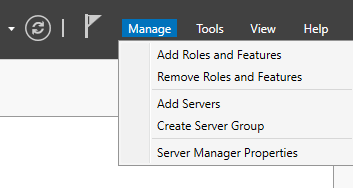
In the server manager go to “Add Roles and Features”
Keep everything default but check “Active Directory Certificate Services”
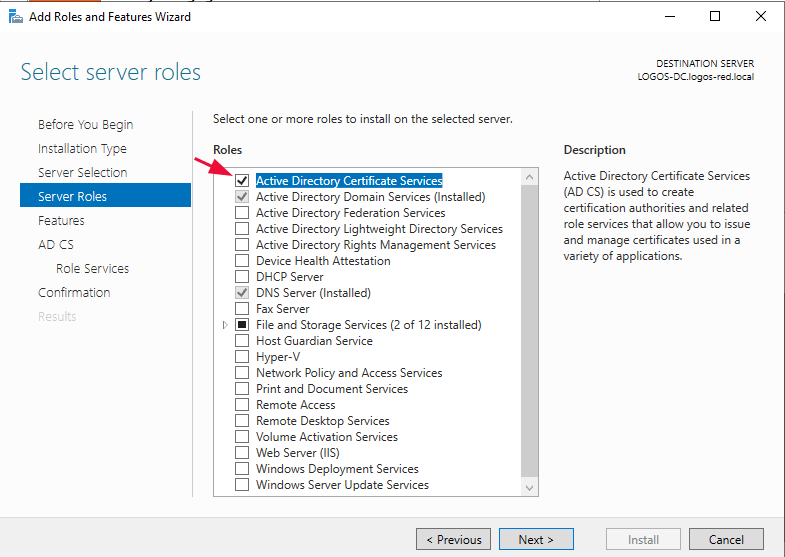
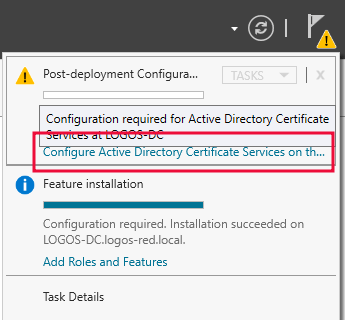
Install and then in the top right you will see a little flag. Click on it.
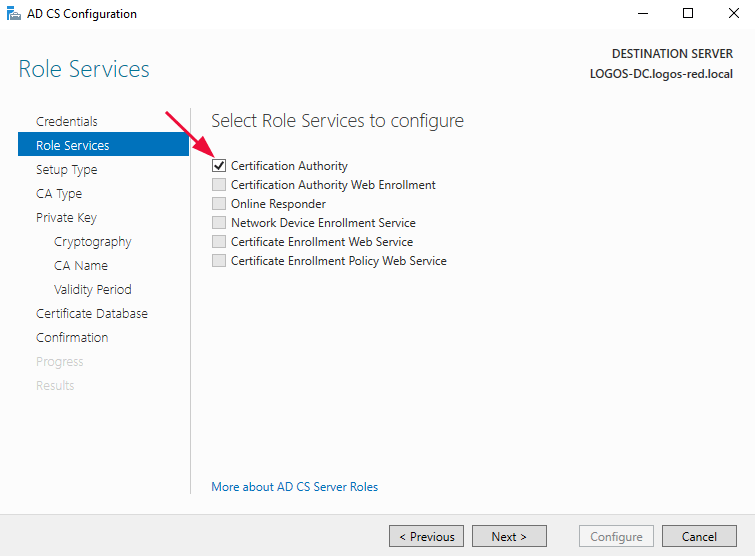
Keep everything default but check “Certification Authority”.
And then “Configure”
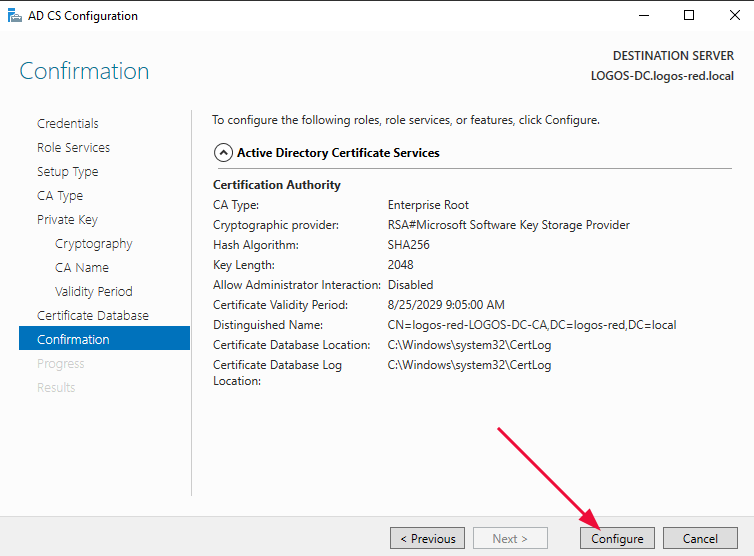
Make sure to reboot the server. We’re finally done with our domain controller.
Joining our workstation to the domain
On your Windows 11 machine make sure you set the DNS server in the same way you did on your Windows 22 server:

And then search for the following:
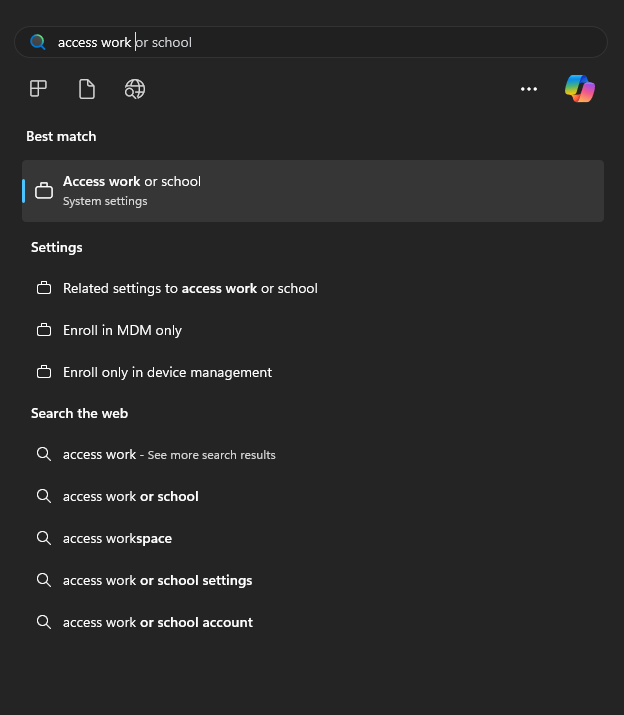
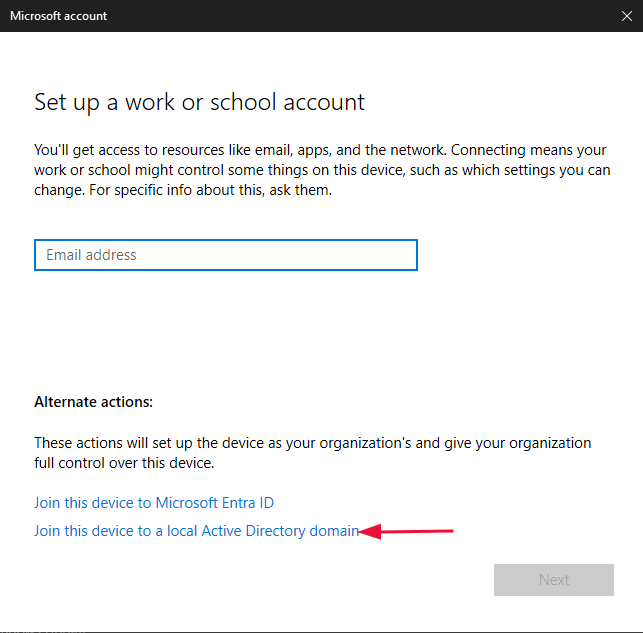
And then “Join this device to a local Active Directory domain”.
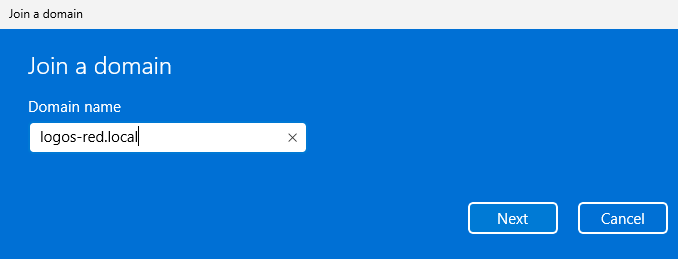
Choose the same domain name as set previously:
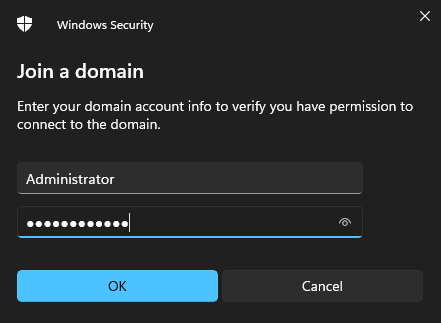
And the username as “Administrator” followed by your simple password:
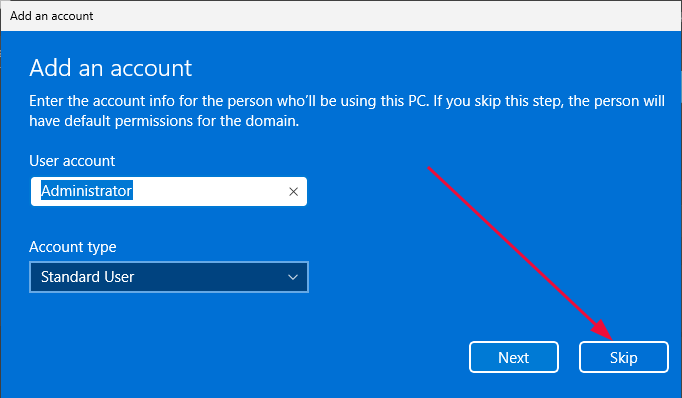
Skip adding an account and then restart.
Make sure to choose “Other user” and sign in with the user account you added earlier. This is to make sure everything is working as expected.
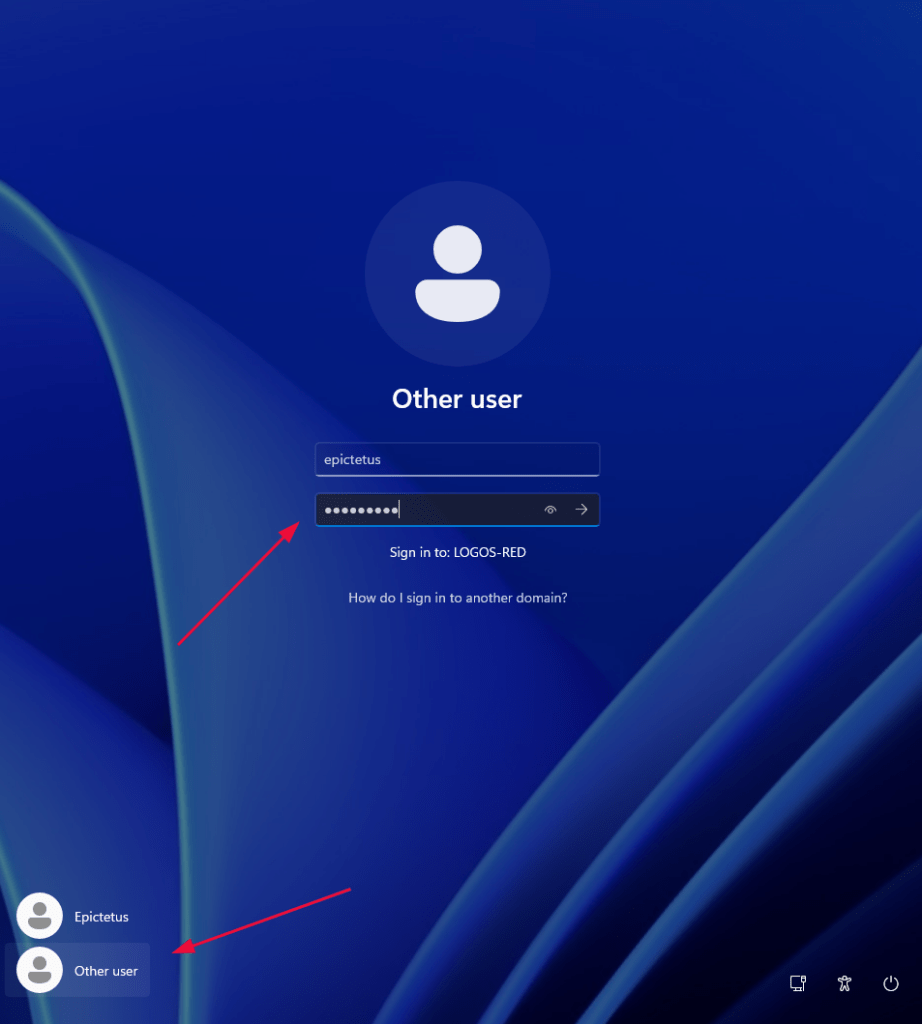
Then sign out by pressing ALT + F4 and selecting “Sign out”.
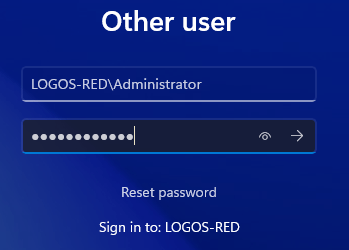
Now we will log in as the Administrator with the following Syntax:
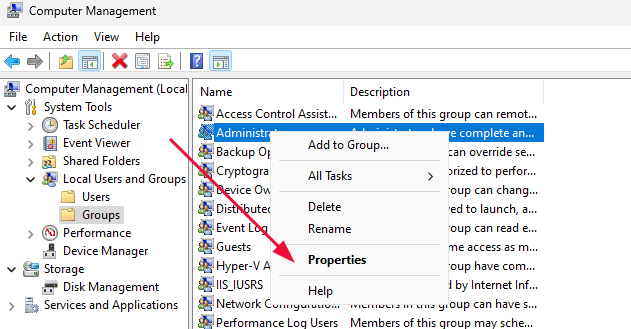
Search for “Computer Management” and then go to “Groups,” right click on “Administrators” and add one of the regular users from earlier as a local admin.
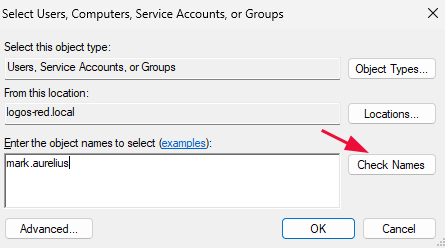
Click on “Check Names” to make sure your naming convention is right and then “Ok”
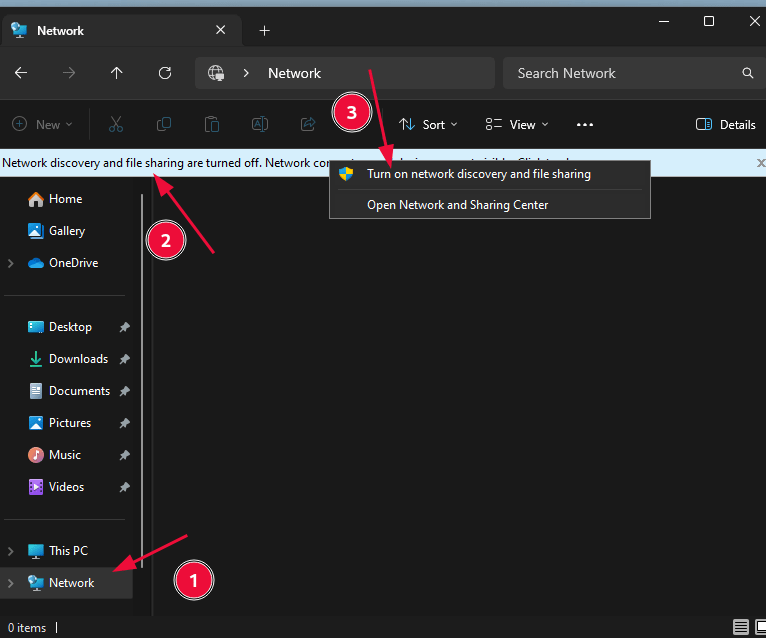
Go to Network and also enable network discovery and file sharing.
Now repeat this whole process once again in the same way with another windows 11 machine but make sure to add both of the users you created earlier as local administrators.
On Linux with QEMU you can clone a virtual machine as such:
sudo virt-clone --original original_win11 --auto-clone --name new_machine_name --file /var/lib/libvirt/images/new_machine_name.qcow2Make sure to replace original_win11 and new_machine_name with your original Windows 11 machine and the new name you want for it.
Conclusion
We’ve successfully set up our vulnerable lab environment by creating an Active Directory domain, configuring users with weak passwords, and disabling essential security features like Windows Defender. We also connected two Windows 11 workstation to our domain, setting the stage for further exploration.
This lab is now ready for us to dive into and practice hacking techniques. In the next posts, we’ll begin testing and exploiting vulnerabilities using our Kali Linux machine.
More Resources
If you didn’t understand something or you need some help, we have our own Discord community and I currently offer free coaching.
You can also leave us some feedback with what you did not understand and we will make sure to correct it.